Top 5 Helpful Yoga Poses for Scoliosis

Nowadays, Yoga is no stranger to everyone because it brings benefits to mental and physical health. In particular, there are yoga poses that are very ... read more...beneficial in treating symptoms of scoliosis. The following article will introduce you to helpful yoga poses for scoliosis.
-
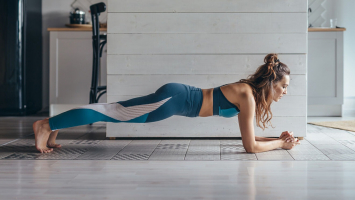
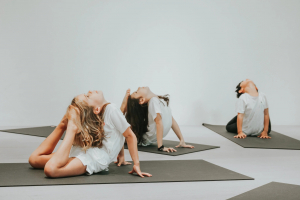
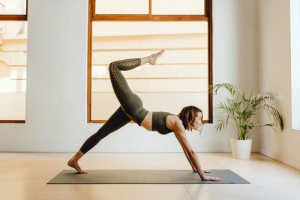
One of the helpful yoga poses for scoliosis is the side plank pose. The side plank is one of the simplest exercises for working the obliques, the two layers of muscles that run along the sides of your core. These muscles assist you in rotating and flexing your torso, as well as protecting your spine. Maintaining a posture on the outside of the spine (outside the circle) can assist strengthen the abdomen and spinal muscles, and in theory, bending the spine out to the outside can help enhance spines. power.
Step by step:
- Lie on your right side with your legs straightened and your feet crossed. Place your right elbow under your right shoulder with your forearm pointing away from you and your fist clenched. The right hand's little finger is in contact with the earth.
- Exhale and contract your body while keeping your neck straight.
- Lift your hips off the mat so that your weight is supported by your elbow and the side of your right foot. From your ankles to your head, your body should be in a straight line.
- Maintain this position for the length of the workout. Aim for 15 to 60 seconds, depending on your fitness level.
- Rep on the other side.
Beginner’s Tips:
- To increase your stamina, execute a half version of this stance. Move your top foot forward in front of you instead of stacking it on top of your bottom leg. Bend your upper leg's knee to 90 degrees and place your foot in front of you on the ground so that your knee is in line with your hip and the top of your thigh is flat as a table.
- Your upper leg's toes should point in the same direction that you are facing. As a result, the front foot bears some of your weight as well. Hold this stance for a few minutes to strengthen your core and arms. You're ready to practice the intermediate version of this position as mentioned above once you've gotten used to holding this preparatory pose for around a minute.
During the activity, keep the following points in mind:
- It's fine if holding a side plank is difficult for you. While you're building strength, try doing the exercise from your knees rather than your feet.
- Maintain a forward-facing posture with your hips stacked. Avoid rotating your body as much as possible.
- During the workout, don't let your hips sink. Reduce the duration of the side plank if you can't keep the posture. It is preferable to complete 20 seconds with good form rather than 50 seconds with poor form.
- Throughout the exercise, try to maintain your face and bottom hand relaxed.
- The side plank raises the lumbar square muscle, which acts as a spine stabilizing muscle. Maintaining the strength of this muscle can help to lessen the risk of injury to the spine. Poor core endurance is linked to an increased risk of injury, according to a 2016 study published in the International Journal of Sports Physiotherapy. Planks and sideboards can help you avoid spinal damage by incorporating them into your exercise routine.
Source: Yoga With Adriene's Youtube Channel Source: Howcast's Youtube Channel - Lie on your right side with your legs straightened and your feet crossed. Place your right elbow under your right shoulder with your forearm pointing away from you and your fist clenched. The right hand's little finger is in contact with the earth.
-
The Mountain Pose is the foundation for all standing yoga poses. This pose is frequently used to warm up for other poses, but it can also be done on its own to improve posture.
The Mountain Pose enhances your posture and body awareness while also strengthening your legs and aligning your body. Tadasana may not appear to be much, yet it takes a lot of effort to maintain your body active and aligned. You don't simply stand in any of the traditional positions. Each body part and its role in straightening your bones and maintaining your spine long must be understood. If you work your leg muscles as hard as you can, you may even sweat. The climbing pose, in particular, will aid you with back difficulties. It is also a helpful yoga poses for scoliosis.
Step by step:- Begin by standing with your heels slightly apart and your big toes touching. Ascertain that your weight is distributed evenly between both feet and from heel to toe.
- Straighten your legs and elevate your kneecaps by using your thigh muscles. Drop your tailbone to the floor and lift your pubic bone to the sky to rotate your hips down.
- Press your shoulder blades against your back and release with your arms at your sides. To broaden your chest even further, widen your collarbones, but don't let your rib cage reach over your hips.
- Bring your head to the center of your body, aligning your spine from the top of your head to the bottom of your tailbone.
- Release any tension in your head and neck by staring off into the horizon.
- With slow, even breaths, stay in this position for 30 seconds to one minute.
- The Mountain Stance is a common yoga pose that serves as a foundation for a variety of other poses. During the stance, you are strong and tall, as the name implies. While the posture can be done on its own, it is most often employed as a resting or transition stance, similar to the Child's Pose. It's a good beginning point for a lot of other postures since it helps the body to connect the previous one with the next.
- The climbing pose enhances your posture and body awareness while also strengthening your legs and aligning your body. It improves and aligns your spine, in particular.
Beginner’s Tips:
- It's critical that you take a stand. To begin, start in a balanced Mountain Pose by placing your feet where they would naturally fall when walking forward, with a few inches between them. Maintain a forward-facing posture with your hips and knees.
- To keep your stance strong and maintain the integrity of the pose, gently activate your core and avoid locking your joints.
During the activity, keep the following points in mind:
- This pose should not be attempted if you suffer from migraines, sleeplessness, or low blood pressure.
- This pose is also not recommended for persons who have medical disorders that cause them to lose their balance.
Photo: Sikana English's Youtube Channel Source: Mind Body Soul's Youtube Channel -
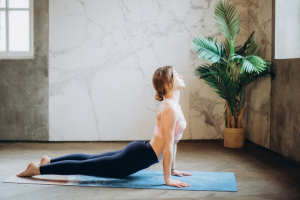
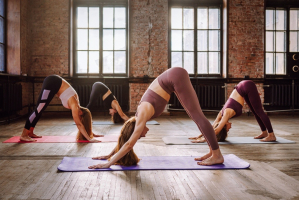
Downward Dog start in a plank posture with arms extended and hands on the floor, then push hips back and up into an upside-down 'V' position, then pull hips back to the floor while taking a deep breath. By exposing the spine to stretching motion while uniformly spreading the body's weight onto the legs, this pose is proven to reduce spinal stress. This position can help decrease pain and discomfort caused by muscular stiffness and stiffness in the spine and promote flexibility when done. Downward Dog is one of the helpful yoga poses for scoliosis is the side plank pose.
Step by step:
- Come to a hand-and-knee position, with your wrists beneath your shoulders and your knees beneath your hips.
- To lift your hips and straighten your legs, curl your toes under and push back through your hands.
- From the forearms to the fingertips, spread your fingers and grind them down.
Rotate your upper arms outwards to expand your collarbones. - Allow your head to dangle and your shoulder blades to slide away from your ears and toward your hips.
- Strongly engage your quads to remove the weight of your body from your arms. This motion contributes significantly to making this a resting stance.
- Inwardly rotate your thighs, maintain your tall height, and lower your heels to the floor.
- Come forward to a plank position to double-check the distance between your hands and feet. In both of these stances, the space between the hands and feet should be the same. In order to get the heels on the floor in Down Dog, do not step the feet towards the hands.
- To release, exhale and bend your knees, then return to your hands and knees.
Beginner’s Tips:
- Lift slightly up onto the balls of your feet, bringing your heels a half-inch or so away from the floor, to stretch the backs of your legs more. Lifting vigorously from the inner heels, draw your inner groin deep into the pelvis, then stretch your heels back onto the floor.
During the activity, keep the following points in mind:
- Lift slightly up onto the balls of your feet, bringing your heels a half-inch or so away from the floor, to stretch the backs of your legs more.
- Lifting vigorously from the inner heels, draw your inner groin deep into the pelvis, then stretch your heels back onto the floor.
Photo: Alo Moves - Online Yoga & Fitness Videos's Youtube Channel Source: Yoga With Adriene's Youtube Channel -
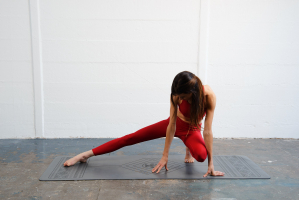
Warrior Pose is beneficial for those with scoliosis because it improves balance and stamina, and, when done correctly and consistently, it can strengthen your back, resulting in a healthier spine and improved assistance. The warrior position is beneficial for loosening the psoas muscles, which are linked to lumbar scoliosis.
Step by step:
- Begin in Mountain Pose (essentially standing on purpose), with your back to the mat's broad edge. Step your left foot about 4 feet away from the mat's left edge, far enough for your left leg to straighten.
- To face the front of the mat, rotate the left foot 45–60 degrees inward and the right foot 90 degrees. Maintain a straight line between your heels and your center of gravity.
- Bend your front knee with your hands on your hips (right). Hinge on your left toes with your back leg straight until the sole is at a 45-degree angle with the mat's back edge.
- Align your center of gravity with an imaginary line between your heels, keeping your center of gravity balanced around your hips and pelvis.
- Raise your arms to a 90-degree angle to the floor, pointing straight up. Pull your shoulders into your spine by squeezing them.
- Feel the lift in your arms as they travel up your back leg, through your abdomen, chest, and arms to your little finger. Make sure your head is in a neutral position and that you're facing ahead.
- Straighten your front leg and rotate your foot back toward the mat's wide edge with your arms out to the sides when you're ready.
Beginner’s Tips:
- Concentrate on your breathing and posture. Feel what it's like to have both legs "active" without having to tighten your knee joints. To avoid putting pressure on your lower back, keep your back straight and tall.
During the activity, keep the following points in mind:
- The front knee should not dip in or extend past the front toes.
- The back heel was too far out.
- In the lower back, there is an overarching.
- A stance that is too narrow or short.
- Shoulders should be elevated and arms should be slack.
Source: Yogini Angelina's Youtube Channel Source: Yoga International;;s Youtube Channel -
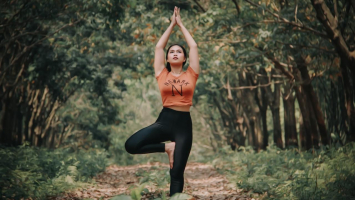
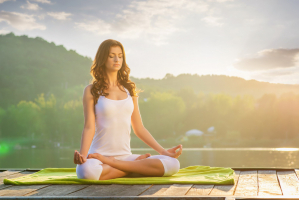
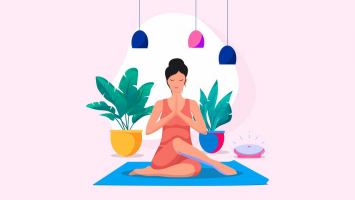
With the tree pose, you'll strengthen the muscles that support your spine while also improving your balance and posture. The tree position is a stress reliever that can also help with scoliosis pain management. While completing the mountain stance, shift your weight to one foot and do the tree pose.
Step by step:
- Shift your weight to your left foot after completing the mountain posture.
- Reach down and grip your right ankle with your right hand.
- Place the sole of your right foot against your left thigh as you lift your right foot. If you're unable to reach your thigh, place your foot against your calf instead.
- Your spine should be stretched and lengthened. Draw your pelvic bone inward and your tailbone down to the ground.
- Move your shoulder blades together and place your palms together in front of your chest.
- Take slow, steady breaths while gazing forward.
Beginner’s Tips:
- If you're a newbie, you might have trouble keeping your balance on one foot. In this instance, you can rely on the wall's assistance. Simply stand in front of a wall and do this asana while leaning against it for support.
- It's difficult at first to position your foot on the upper thigh. So it's fine if you put your foot on the other leg's lower thigh.
During the activity, keep the following points in mind:
- Do not practice this pose when suffering from insomnia, headaches, or migraines.
- Tree pose is not recommended for people who have recently injured their legs, shoulders, arms, or spine.
Source: RosalieYoga's Youtube Channel Source: YOGA UPLOAD with Maris Aylward's Youtube Channel - Shift your weight to your left foot after completing the mountain posture.