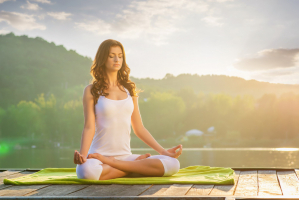
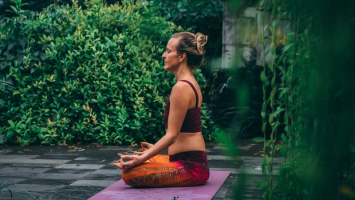
Top 12 Basic Yoga Postures

“Health is wealth. Peace of mind is happiness. Yoga shows the way.” – Swami Vishnudevananda. Āsana is one of classical yoga's eight limbs, and it claims that ... read more...positions should be stable and comfortable, firm yet relaxed and that they should help a practitioner become more aware of their body, mind, and environment. The basic sana sequence of Swami Vishnudevananda consists of 12 postures that are far more than just stretching. They stretch and tone all of the body's muscles and joints, as well as the spine and the complete skeletal system. They function not only on the outside of the body, but also on the inside organs, glands, and neurological systems to keep us healthy. They unlock tremendous reserves of energy by reducing physical and mental strain, giving us vigor. With consistent practice, the poses intentionally become a concentration and meditation exercise, resulting in a calmer mind and reduced tension. Let's discover 12 basic yoga postures in this article.
-
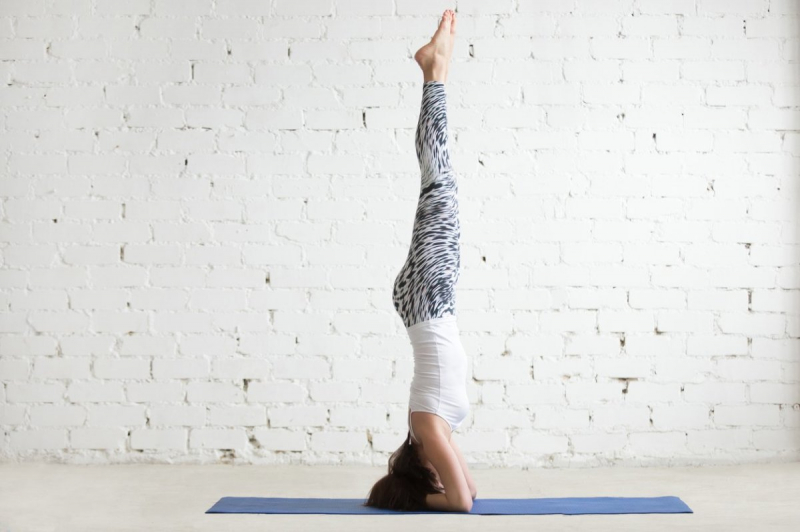
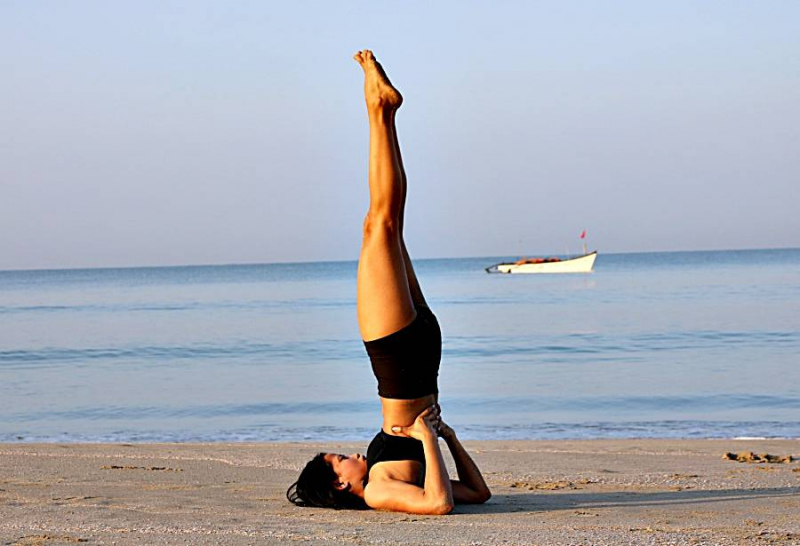
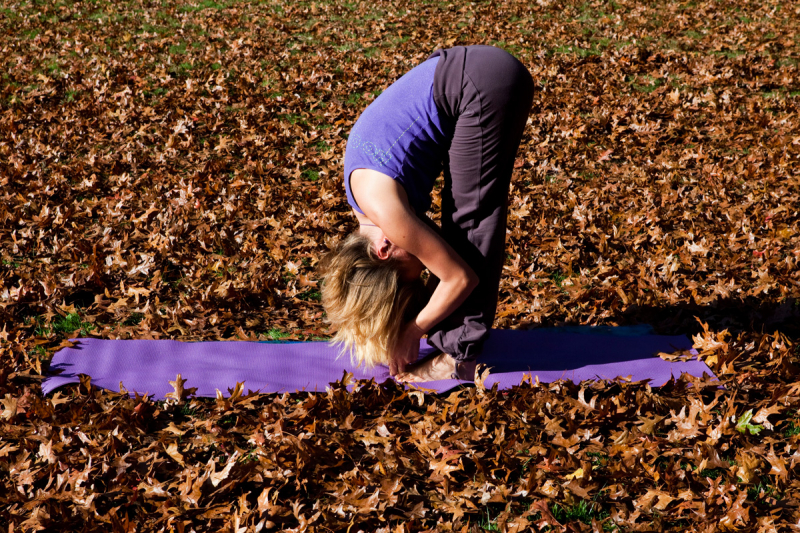
The first pose to mention among the 12 basic yoga poses is Headstand or Sirsasana. Headstand (Sirsasana) is a balancing pose that requires you to balance on your elbows, arms, and head. śīrṣa stands for the head. The Headstand is the first in the sequence and is known as the "King of Sanas" due to its numerous benefits. "Head-stand is a panacea, a cure-all, a sovereign specific for all diseases," according to Swami Sivananda.
The brain benefits from being upside down in this āsana because it draws plentiful oxygen-rich blood from the heart. It helps with meditation practice since it improves memory and attention. This posture allows more energy to go to the head. The headstand energizes the ājñā cakra while directing energy to the maṇipūra cakra.
The position enhances circulation, strengthens the heart and respiratory system, improves memory, concentration, and mental capacity, and promotes relaxation. The senses are enhanced and the brain, spinal cord, and sympathetic nervous system are energized. The pituitary and pineal glands are activated, reviving the mind and body as a whole. Inversion therapy treats varicose veins, constipation, psychological disorders, and anxiety. It also improves sleep quality and boosts confidence.
Step by step:
- In Tabletop, begin on your hands and knees. Place your forearms on the floor in front of you as you lean forward. Cupping your palms, bring your hands together and interlace your fingers.
- Place the crown of your head on the floor and your back against your cupped palms. Allow your head to rise slightly off the floor by pressing down with your forearms and elbows.
- Tuck your toes, straighten your legs, and elevate your knees. Then, as you come in toward your head, make sure your hips are straight above your shoulders.
- Bend your knees and use your core to raise or jump your hips and legs off the floor while keeping your weight on your arms (not your head!). Lift your legs up so they are directly over your shoulders, keeping your legs together and knees bent.
- Find your balance in this position, moving your weight as needed.
- As you straighten your legs, hug your thighs together.
- Stay up as long as you feel safe and capable. To release, slowly lower your feet to the floor using your core strength.
Beginner’s Tips:
- Make use of assistance. Practicing against a wall or in a doorway is a good idea. As you gain strength and balance in the position, move one foot away from the wall, then the other.
- Begin small. Try to stay up for 10 seconds, then progressively increase the time by 5 to 10 seconds. Holding a good 20-second pose is preferable to a three-minute pose with no integrity.
- Exit gracefully. Lower your legs in a fluid motion using your abs. With an inhale, lower yourself without losing the lift in your shoulder blades.
Common Mistakes
- You're kicking it up a notch. You don't want to kick up into the headstand, so keep your motions under control.
- Your body weight isn't evenly distributed. Your forearms are also bearing weight, despite the fact that it's considered a headstand. If you're having difficulties figuring out how to distribute your weight properly (which will vary from person to person), consider putting a blanket under your forearms for support.
- You're moving way too quickly. Doing a headstand incorrectly or rushing through the steps to get into (or out of) the position can cause serious injury, regardless of your yoga experience or fitness level. Slow down, keep focused, remember to breathe, and pay attention to your body on a regular basis.
Organic Authority Alo Moves - Online Yoga & Fitness Videos's Channel -
Sarvangasana or Shoulderstand is the second fundamental pose that everyone who wants to exercise yoga should know. It is an inverted stance in which the body is supported by the shoulders. Sarva denotes completeness. Sarvangasana, which literally means "all parts," strengthens the entire body. The position is known as the "Queen of āsanas."
The chin is placed against the throat in this posture, which regulates the thyroid gland, which in turn balances all other glands in the body, ensuring the healthy functioning of all body systems and organs.
The Shoulderstand clears energy blockages in the neck and relieves stress in the neck and shoulder area. It directs energy to the solar plexus while also stimulating the viuddha cakra.
The posture stimulates the thyroid gland, which is responsible for regulating metabolism, protein synthesis, heart rate, blood pressure, and calcium levels. The blood is cleansed, circulation is strengthened, and the posture helps to prevent kidney disease, bone disease, and muscle weakness. Varicose veins and constipation are alleviated, as are mental sluggishness, sadness, and sleeplessness.
Step by step:
- Place your yoga mat on the floor and position your body with the blankets as shown above. Begin to walk your shoulders underneath your upper back, feeling the chest rise gradually, with your legs bowed and feet on the floor (as though preparing for the Bridge pose).
- Coming into Bridge pose, lift your hips off the mat and extend your arms to the ground, palms facing down as if your hands could touch your heels.
- To elevate onto the balls of the feet and extend one leg up, press firmly into the palms and use them as leverage.
- Bend your elbows, lay your hands on your low back to form a shelf, and then extend the next leg up. Don't move your head to the side to look around the room after you've raised your legs because this can harm your neck. Maintain a straight neck and upward gaze instead.
- For extra stability, lift up through the balls of your feet, walking your hands further up the back. To support opening the upper back, feel the chest reaching toward the chin.
- To straighten your body, move your hips toward the front of the room and your feet toward the back. This will assist you in achieving proper alignment, with your hips over your shoulders and your feet over your hips. (Do not bring your body totally vertical if you are not using blankets or other supports.)
- Hold the posture for at least 10 breaths.
- Bring your feet back over your head to come out of Shoulderstand and into Plow posture, slowly rolling out of the Plow.
Beginner’s Tips:
- Use blankets as pillows to shield your neck from extra pressure if you're a newbie. If you don't know how to use blankets, you can ask a yoga instructor in an online yoga session.
- If you turn your head while in the Shoulderstand stance, it will put tension on your spine and neck.
Common Mistakes
- Students frequently perform Shoulderstand with their buttocks protruding and their feet over their foreheads rather than over their hips. The entire stance is thrown off by this. Tuck your shoulder blades under your back and keep your heels over your hips to avoid this problem.
- If you don't keep your core engaged throughout this position, it will be difficult to properly elevate your hips, which will make walking your hands up your back more difficult. Throughout the activity, consciously engage your core.
- Maintaining proper shoulderstand form necessitates maintaining a straightforward gaze. You risk damaging your neck if you swivel your head to look at others or watch the instructor. If you have to, close your eyes to avoid the desire to look about.
phunurovn.com VENTUNO YOGA's Channel -
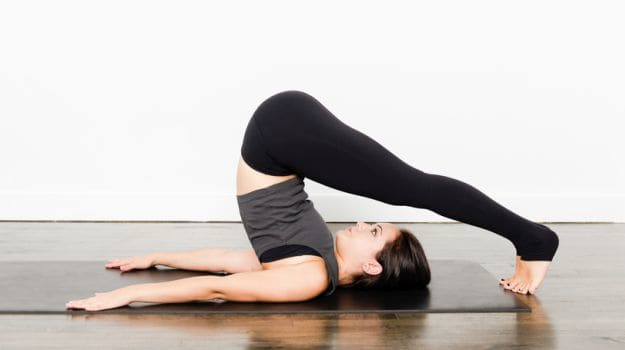
Plough is another of the fundamental yoga poses. Plough is a stance in which the hands and feet are placed on the floor to resemble a plough. It gets its name from the Sankrit word Hala, which means plough.
Halasana tones and energizes the spine while also correcting extreme lower back curvature (lordosis). By stretching the spinal muscles and opening up the spinal discs, the Plough maintains the entire spine youthful. It nourishes the spinal nerves, as well as relieves and prevents back and neck arthritis and stiffness. Back, shoulder, and arm muscles are strengthened, and tension in the cervical region of the spine is removed. Indigestion and constipation are alleviated, the liver and spleen are stimulated, and obesity is minimized by massaging the internal organs.
It clears energy blockages in the neck and back. In this posture, the maṇipūra cakra, or solar plexus, is energized. This is definitely a pose that brings many benefits that any beginner in yoga should not ignore.
Step by step:
- Arrange three blankets such that their edges are parallel. Place the stack near the front of the mat, with the edges aligning with the mat's center.
- Sit at the front of the mat and lean back over the blankets, allowing your torso to be supported. Adjust your position such that your shoulders are about an inch above the edge and your head is resting on the floor. Face up with your neck long in front and space between the rear of your neck and the floor.
- Straighten your legs toward the ceiling after bringing your knees to your chest.
- Lift your hips off the floor and roll up until your shoulders support you, using the strength of your core and the support of both hands at your low or mid-back. Place your hips higher than your shoulders.
- Slowly drop your legs above your head until your toes are level with the ground behind you. Feet flexed, rest your toes on the ground.
- Place your arms on the floor, palms down or clasped, and release your hands. To create greater lift along the spine, press down with your outside upper arms and shoulders.
- Hold for at least 5 breaths.
- Unclasp your hands, press your arms and hands into the mat, and roll down one vertebra at a time to escape.
- Allow the back to return to its natural contours for a few moments.
Beginner’s Tips:
- The blanket's purpose is to elevate the shoulders and prevent the back of the neck from flattening out too much. If you'll need more than one blanket, make sure they're folded and stacked properly.
- As you lift your legs over your head and towards the floor, maintain your knees bent.
- You can alternatively support your feet using a chair or leave your legs in the air.
- When doing this posture for the first time, it's a good idea to have a yoga teacher assist you.
Common Mistakes
- Always pay attention to your body and practice Halasana in a safe manner. Inversions should not be held for more than a few seconds.
- If you have any neck, blood pressure, or digestion concerns, avoid Halasana. Avoid this stance if you have any worries about blood rushing to your head, such as sinus, ear, or eye problems.
- If you are menstruation or pregnant, you should avoid Halasana. Save Halasana on another day if you're feeling weak or tired.
- When your heart is higher than your head, putting pressure on your head and neck might induce or intensify headache symptoms. If you frequently suffer headaches, you may want to avoid inversions or only do them for a brief time.
- When you initially wake up, your body is usually less flexible. This improvement in flexibility may be most noticeable during Halasana.
- If you're used to practicing in the evening and its early morning, keep in mind that you might not be able to go as deep. Pay attention to your body and make adjustments as needed.
Samarpan Physiotherapy Clinic Ahmedabad VENTUNO YOGA's Channel -
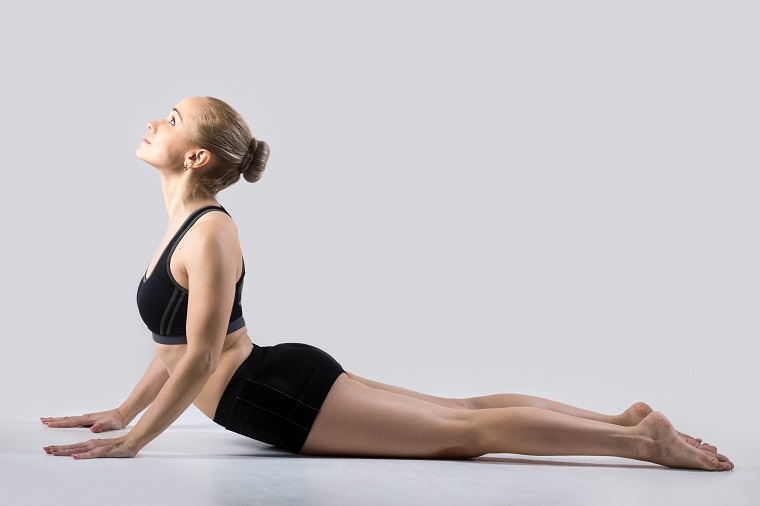
The next pose among the 12 basic yoga postures is Fish (Matsyasana). Doing Fish entails resting on one's arms, arching one's back, and expanding one's chest. Matsya translates as "fish." This posture will allow you to float in water like a fish, hence the term matsyāsana.
The Fish stimulates and purifies the respiratory system, enhancing lung capacity, alleviating asthma, and boosting overall vigor. Matsysana relieves stiffness in the cervical, thoracic, and lumbar regions, increasing blood circulation to these areas. The stance then corrects the modern-day bent back/shoulder issue while simultaneously toning the nerves of the neck and back. The calcium-absorbing parathyroid glands in the back of the neck are stimulated, resulting in a stronger and more plastic skeletal structure.
Emotions are calmed and moods are stabilized. In this posture, the anāhata cakra is awakened, and energy blockages in the throat and neck region are eliminated.
Fish (Matsyasana) is a pose not too much for those who are new to yoga. You just need to do it gently and slowly.
Step by step:
- Bring your forearms flat on the mat and your upper arms perpendicular to the floor as you rise to your elbows.
- Roll your shoulders back and tuck your shoulder blades firmly against your back to keep your forearms in place and puff up your chest. You should be able to feel a backbend in your body.
- Your palms should be pressed into the mat. If tucking your hands beneath your butt is more stable for you, do so.
- Open your throat by lowering the crown (very top) of your head until it reaches the floor.
- Throughout, keep your legs engaged and your toes working.
- Press firmly onto your forearms and lift your head off the floor to come out. Then, with your upper body on the mat, release it.
Beginner’s Tips:
This pose can cause neck pain in beginners. If you're having trouble with your neck or throat, either drop your chest to the floor or place a heavily folded blanket behind your head.
Common Mistakes
- You establish a lift in the upper body, make sure to root into your forearms, heels, and engaged thighs. This will keep your head and neck safe and supported.
- The arch of your neck and back should be continuous. Imagine laying the middle of your crown, not your forehead, on the ground.
Pinterest The Art of Living' Channel -
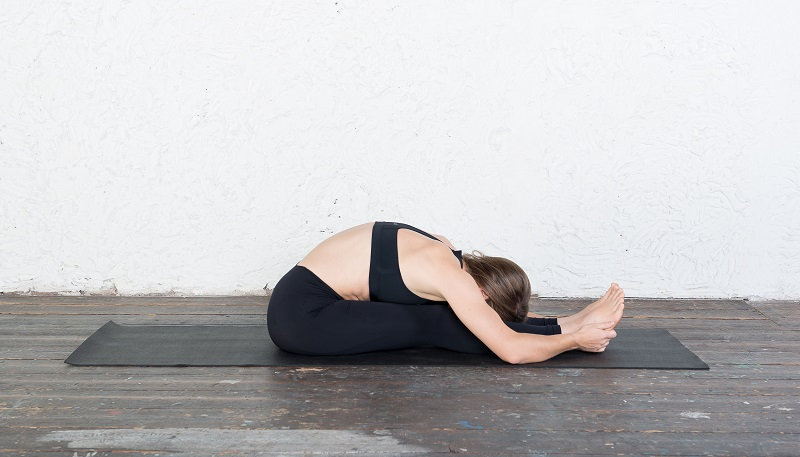
Sitting Forward Bend, also known as Paschimottanasana, is a forward spine stretch. paścima means west (the back of the body) and uttāna means stretched out. This seemingly simple position is one of the most powerful and vital poses.
The Sitting Forward Bend massages stimulate, and tone the entire digestive system, improving digestive power and regulating peristalsis. The pancreas' tasks include managing blood sugar levels and carbohydrate metabolism. Urogenital system disorders are relieved. All of the muscles in the back of the body are stretched, creating hip flexibility. Excess weight around the waist is minimized. The entire nervous system is stimulated, and a sense of surrender is created.
Paschimottanasana relieves the spinal constriction created by standing erect. Continuous practice helps to keep the back supple, joints mobile, the neurological system energized, and the internal organs toned. It also aids in diabetes prevention by providing a natural massage to the pancreas.
Paścimottānāsana stimulates the energies in the major nāḍīs (astral tubes) that run along the spine. It activates the maṇipūra cakra.Step by step:
- Begin by sitting on the edge of a folded blanket in Dandasana (Staff Pose). Press your hands or finger tips into the floor beside your hips, pressing your heels away from your body.
- Inhale. Exhale and lean forward from your hips, keeping your front torso long. Without rounding your back, lengthen your spine to fold toward your legs.
- Walk your hands as far as they will go along the outside of each leg. Hold the sides of your feet with your hands if you can reach them.
- Lift and stretch your front torso somewhat with each inhalation; release a little more fully into the forward bend with each exhalation. Bend your elbows out to the sides and pull them away from the floor if you're holding your feet.
- For 1–3 minutes, stay in the stance. Release your feet to rise. Inhale and draw your tailbone down and into your pelvis to elevate your torso.
Beginner’s Tips:
Resist the impulse to lower your head and shoulders toward your shins, as this will cause your upper back to round. Pascimottanasana keeps the back flat.
Common Mistakes
- Maintain a straight line with your knees and avoid allowing them to curve out. If this happens, the stretch in your hamstrings will be reduced, and the tension will be concentrated closer to your joints.
- Keep your back straight in the stance for as long as you can. This will assist you in taking full breaths.
Arhanta Yoga Ashrams The Art of Living' Channel -
The next basic yoga poses to learn for beginning yoga practitioners is Cobra or Bhujangasana. The stance involves arching the back and expanding the chest. In Bhujangasana, bhujanga signifies cobra. The series begins with the first of three backward bending postures.
The Cobra enhances spine flexibility while reducing curvature. The deep and superficial back muscles are strengthened and massaged, revitalizing the nerves and muscles of the spine and alleviating arthritis of the lower back and general lower back discomfort. It helps to strengthen the neck and upper back.
The Cobra is especially useful for women since it soothes menstruation cramps by applying pressure to the pelvic organs. The ovaries and uterus are toned, which helps with menstrual issues. The adrenal glands and kidneys are stimulated, which reduces anxiety and stress.
The strong contraction stimulates the maṇipūra cakra, which conducts energy throughout the body.Step by step:
- Start on your stomach, feet hip-distance apart and hands beside your ribs.
- To engage your quadriceps, straighten your big toes and press down with all ten toenails.
- To expand the lower back, rotate your inner thighs toward the ceiling.
- Lift your head and chest, rotating your shoulders back and forth, while lightly pressing down with your hands.
- Maintain a long back of the neck and elevate your sternum rather than your chin when lifting your chin.
- Straighten your arms while maintaining a shoulder distance from your ears. Maintain a small bend in your elbows at all times.
- Release back to your mat to exit the stance.
Beginner’s Tips:
Reduce the height of the position if you experience any discomfort or compression in your lower back. Instead, concentrate on building strength in the upper back, namely between the shoulder blades.
Common Mistakes
- It's critical to keep your hands aligned beneath your shoulders. The resulting angle will raise your shoulders up by your ears if your hands are too far away from your torso.
- Also, avoid straightening your arms to the point where your elbows are locked. Feel free to bend your elbows slightly or keep your arms at a 90-degree angle. Elbows should be angled backward rather than out to the sides. This is a technique that uses your back muscles rather than your arms.
- Because the lower back is more flexible than the upper back, you may find that you have greater flex in that area. Attempt to maintain a consistent curve throughout your entire back.
- Do not extend your neck too far backward. It will be arched, yet it will be a natural extension of the upper spine.
Yoga Teacher Training Rishikesh The Art of Living' Channel -
Locust or Śalabhāsana refers to lying on the front with your legs elevated. This is one of the basic yoga postures that all yoga doers need to understand.
Śalabhāsana improves intestinal function, strengthens the abdominal walls, and improves digestion. The Locust massages the pancreas, liver, and kidneys while increasing blood flow to the neck.
The upper back, leg, and arm muscles are strengthened. The backward bending of the spine in this position enhances cervical flexibility and alleviates lower back pain and sciatica.
This posture is really beneficial for establishing willpower. In Locust, the stimulation of the maṇipūra cakra energizes the rest of the body.
Step by step:
- Begin on your stomach, with your feet together and palms down, and your hands stretching back.
- To engage your quadriceps, straighten your big toes and press down with all ten toenails.
- To expand your lower back, rotate your inner thighs to the ceiling.
- Raise your head, torso, and legs, leading with your inner thighs, while keeping your hands lightly on the mat.
- Back up and away from the floor, roll your shoulders back and up. Maintain a long back of the neck and focus on elevating your sternum rather than your chin. Do not clench your glutes.
- Slowly release to come out of the posture.
Beginner’s Tips:
Beginners may struggle to maintain the lift of the body and legs in this pose. Begin the pose by placing your hands on the floor, slightly back from your shoulders and closer to your waist. To help lift the upper torso, inhale and softly press your hands against the floor. Then, either leave the hands in place throughout the pose or, after a few breaths, swing them back into the position described in step 3 after you've established the lift of the chest.
Common Mistakes
- If you want to avoid crunching your neck, keep the back of your neck long and your chin slightly tucked in. Raising your shoulders towards your ears is not a good idea.
- Avoid bending your knees because this puts a greater strain on your lower back.

Yogateket Yoga With Adriene's Channel -
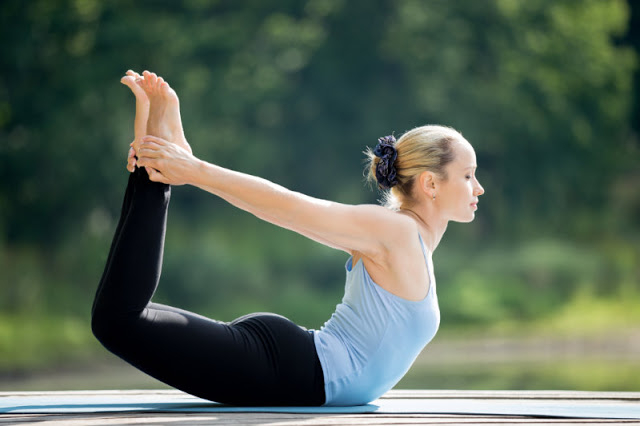
The word dhanur means "bow." Bow, also known as Dhanurasana, is a balancing pose on the abdomen in the shape of a bow. Dhanursana combines and strengthens the advantages of the Cobra and Locust positions.
This posture increases flexibility in the cervical, thoracic, lumbar, and sacral regions by working on the entire spine. It massages and stimulates the digestive organs, which aids in the relief of a variety of maladies such as constipation, dyspepsia, and gastrointestinal disorders.
Rheumatism of the legs, knees, and hands is avoided. Back muscles are massaged, and the spine is kept flexible. Blood flow is increased, abdominal fat is eliminated, and abdominal muscles are strengthened. The respiratory system is strengthened, and asthma symptoms are alleviated. Increases self-assurance.
The position is another good āsana for women because it alleviates menstrual issues. The Bow energizes the entire body by stimulating the maṇipūra cakra.
Step by step:
- Lie on your mat on your stomach, if necessary, with a blanket under your pelvis. Keep your toes active by pressing all of them into the floor and then bending your knees.
- With your hands, grab the outer sides of your ankles and flex your feet firmly.
- Lift your rib cage and shoulders toward your ears as you inhale. Exhale and stretch your tailbone, kicking your legs back into your hands while maintaining a tight grip.
- Raise your head and heart from here. Take a step forward. To elevate your chest, press down through your thighs.
- For 5 breaths, keep your head elevated.
Beginner’s Tips:
Lifting the thighs off the floor may be tough for beginners. For further support, wrap a blanket and place it beneath your thighs. While doing Dhanurasana, some people find it difficult to grasp and hold onto their ankles. To solve this problem, wrap a cloth around your ankles and hang on to the edges as you train your body to become flexible enough to perform the perfect bow stance.
Common Mistakes
- Holding the tops of your feet is not a good idea. Grab your ankles rather than any other area of the foot when reaching back with your hands. The ankle is the safest area of the foot, however, gripping the tops of the feet can cause sliding. You may lose your balance and strike your chin or chest on the floor if your hands slip.
- Knees should be hip-width. Bow Pose's correct form relies heavily on the width of your knees. When your knees are too close together, you may experience back pain. It can also cause straining by opening the hips inappropriately. Maintaining a hip-width distance between your knees allows your body to align safely and comfortably.
- Carefully rotate the shoulder socket. Bow Pose asks you to reach back and then lift your arm. Throughout the exercise, make sure to rotate your shoulder slowly and cautiously. Rushing through the reaching and lifting of your arms can cause injury or discomfort to your shoulder.
- Release the Pose with Care. Bow Pose can be difficult to enter and depart for beginners and persons with limited flexibility. To avoid damage and strain, it's critical to release the pose safely. Once you've dropped your head, torso, thighs, and feet, release the pose. When certain body parts are raised, releasing the stance can result in a painful impact on the floor. Slowly lower yourself, then release your ankles as soon as it is safe to do so.
- Take a deep breath, but don't hold it. Holding your breath is an element of several yoga positions, and it can be beneficial. You don't have to hold your breath in Bow Pose. To get the most out of this stance, make sure you're breathing correctly. As you bend into and out of the pose, exhale. When you elevate your head, take a deep breath. Holding your breath might make it difficult for your chest to expand.
Vinyasa Yoga Ashram The Art of Living' Channel -
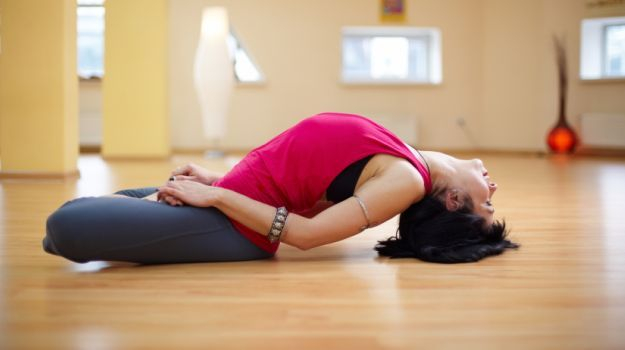
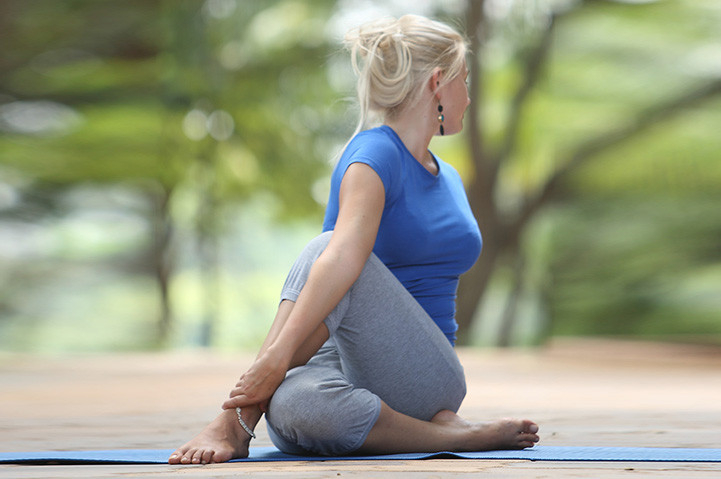
Ardha means "half," Matsya means "fish," and Eendra means "king." Ardha Matsyendrasana, or Half Spinal Twist, is a twist for the complete spine. Matsyendranath, the renowned yogi, inspired the name of this asana.
The Half Spinal Twist mobilizes the vertebrae by turning them in both directions, increasing spine mobility. The Half Spinal Twist is a lateral stretch that improves lower back discomfort, lumbago, and back and hip rheumatism. Deep back muscles are strengthened, and stooping shoulders, bent back, and overall poor posture is rectified.
It tones and stimulates the sympathetic nervous system, massages the digestive organs, and stimulates the liver, large intestine, gall bladder, spleen, and kidneys, easing digestive disorders.
This position permits nourishing new blood to reach the spinal nerve roots and the sympathetic nervous system. Ardha Matsyendrsana equalizes the left and right sides of the nāḍīs (astral tubes).
Step by step:
- Start by sitting in Sukhasana. Bring your feet alongside your hips and cross your right or left knee on top.
- Raise your right knee to the outside of your left knee and plant the soul of your right foot on the mat.
- For support, place your right hand on the floor outside of your right hip. Make sure you're sitting on both sitting bones in the evening.
- Take a deep breath in and raise your left hand to the ceiling. Take a deep breath out and bring your left elbow to the outside of your right knee. To add resistance, press your knee and elbow together.
- Look past your right shoulder as you turn your head to the right. Make sure your neck isn't strained.
- As you hold the posture, take a few deep breaths, stretching on each inhale and gradually twisting a little further on each exhale.
- Inhale to reach the right arm up and unwind the body to exit the posture. To return to the center, exhale. Rep on the opposite side.
Beginner’s Tips:
- To ground through both sitting bones and stretch your spine, sit on a cushion or blanket. The key goal in this stance is to keep the spine long.
- With your lower leg extending in front of you, try the posture. If you have trouble keeping both sitting bones grounded, this can assist.
- Hugging your knee with your hand rather than looping your elbow behind it is a totally acceptable alternative.
Common Mistakes
During this twist, keep your back straight and your vertebrae stacked, not rounded.
The Art of Living Foundation VENTUNO YOGA's Channel -
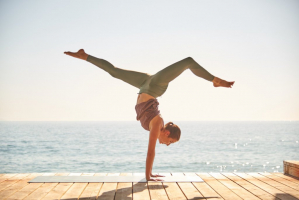
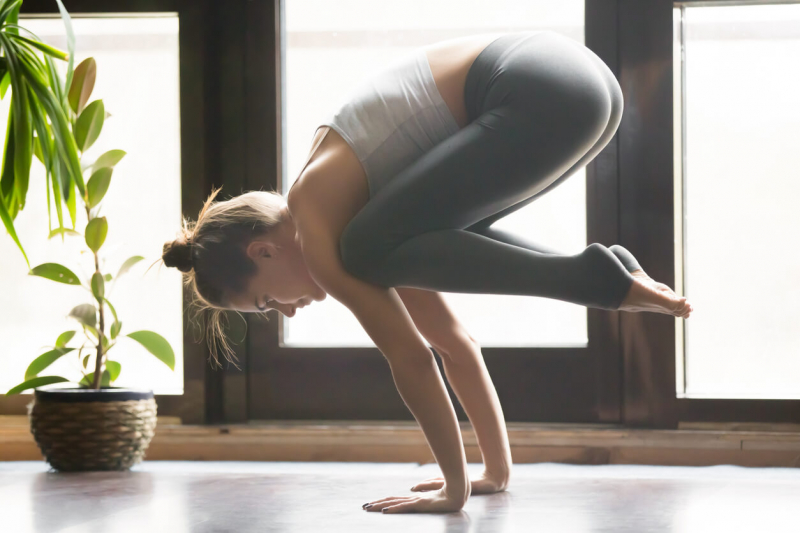
Balance, whether physical, mental, or emotional, is difficult to come by these days, and the pursuit of equilibrium is frequently a motivation for practicing yoga. The balancing postures of hatha yoga provide the body and mind with a sense of lightness and inner harmony. They also promote concentration and confidence while increasing strength and poise. The balancing postures expose our flaws and put our mental fortitude and nervous system control to the test. Arm balances, in particular, are useful for calming a wandering mind and smoothing out an unpredictable breathing pattern. The crow pose (kakasana, pronounced caw-caw-sana, like the crow's call) is one of the easiest arm balances to learn.
In Kakasana, the arms become the crow's legs, the hands become the crow's feet, and the thighs and legs are curled up to form the crow's body. Crows are quick on their feet, they hop and fly. They're not stuck on Earth. Unlike us, they do not have a pedestrian's sense of gravity. Assuming a crow's posture by bearing our weight on our hands and keeping the body compact and near to the ground allows us to break free from our regular patterns of locomotion and habitual tactics for regulating the body in relation to gravity.
Developing this new feeling of balance in the crow posture helps coordination while also developing strength and flexibility. Wrists, arms, and shoulders benefit the most, as they are not only stretched and strengthened but also revitalized. This position is particularly stimulating to the neurological and circulatory systems in the upper limbs and torso. The posture instills confidence in the arms' ability to hold the body's weight, as well as a sense of lifting and control via the pelvis and abdomen. This is essential for optimum health as well as the performance of many other asanas and pranayama techniques.
The crow posture can be difficult, but with proper technique and a little strength and flexibility, it's a lot of fun to try. It requires some arm and shoulder strength, but it is not as difficult as it appears. The sun salutation is an excellent exercise for improving shoulder strength and flexibility, as well as the whole-body integration essential for balance. Furthermore, performing the crow pose with tight, weak arms and shoulders can cause wrist pain, whereas the downward- and upward-facing dog positions (part of the sun salutation) strengthen the wrists. Even yet, those with wrist injuries or issues should proceed with caution or skip this position in favor of balance poses that do not extend the wrists, such as the headstand or forearm balance.
The crow posture can be difficult, but with proper technique and a little strength and flexibility, it's a lot of fun to try. Hip flexibility and lower abdominal strength are also elements that limit the crow pose, thus the following postures can help prepare you for it.Step by step:
- Begin with your knees wide apart in a squat. It doesn't matter if your feet are together or apart.
- Place your hands 6–8 inches in front of your feet, shoulder distance apart, on the floor. Your hands can be a little wider if your shoulders are tense.
- Raise your hips high and land on the balls of your feet. Bring your knees up to the level of your upper arms.
- Tilt your torso forward to the point where your shoulders are positioned between your legs.
- Press your knees firmly against your upper arms. Crow requires you to balance them on your triceps, whereas Crane requires you to tuck them closer to your armpits.
- Continue reaching forward with your chest until your elbows are stacked over your wrists and your center of gravity shifts.
- Raise your heels to the level of your buttocks. You can either grab your outside shoulders with your knees or balance your triceps with your knees.
- Press your arms as straight as can while pulling your feet and buttocks together for Crane.
- Hold for 5–10 breaths before letting your feet fall to the floor.
Beginner’s Tips:
- Before attempting these poses, warm up your wrists.
- Beginners usually enter this position by elevating their buttocks high off the ground and away from their heels. Rather, keep your tummy tucked in and your heels and buttocks close together.
- Push your upper arms on your shins and drag your inner groin toward your pelvis to assist with the lift when you're ready to take your feet off the floor.
- Strengthening your core is beneficial. Although Crow and Crane appear to need a lot of arm strength, the majority of the work is done by your abdominals. As your abs become stronger, you can reduce the amount of weight you place on the backs of your arms.
- Don't rush the position or try to find balance by propelling yourself forward hastily. Slowly walk, ensuring that you maintain your balance at all times.
- You will feel more stable and strong if you press your arms into your knees and your knees into your arms.
- If your elbows splay out or your shoulders slump, practice transitioning from Plank to Chaturanga Dandasana (Four-Limbed Staff Pose) with your elbows in and shoulders back away from your ears. This will build upper-body strength and prepare you for Crane or Crow.
- Fear of falling can make it difficult to enter Crane or Crow. While learning this pose, it may be beneficial to place a folded blanket, bolster, or cushion on the ground beneath your head.
Common Mistakes
- Weight is unevenly distributed when the hips are excessively high, practically vertical to the head. This not only raises the likelihood of face-planting on the mat but also increases the pressure and weight on the wrists. Muscle and joint ailments can result from carrying too much weight on the wrists. Furthermore, because the arms compensate for a lack of core activation, unequal weight distribution makes the body feel heavier and more difficult to lift. Activating the intercostal and back muscles lifts and holds the legs up, gently rounding the back. The weight is distributed more equally throughout the palms by spreading the fingers and grounding from the knuckles to the fingertips. The angle of the wrists to the floor is also reduced by moving the hips back and keeping the elbows stacked directly above the wrists (forearms perpendicular to the floor).
- Because outward-pointing elbows can stress the joint and raise the weight in the wrists, bending the elbows out to the sides may create joint pain. This is also why, in Chaturanga, it's ideal to keep the elbows hugging the ribcage. As a base for Crow Pose, practice Chaturanga arms. Elbows directly over wrists, bending backward so that the creases face forward.
- Tension is frequently held in the shoulders. Crow Pose causes the shoulders to slide up to the ears, compressing them and perhaps injuring the shoulder girdle or rotator cuff. Begin by rolling your shoulders down your spine before reaching forward with your sternum and opening your collarbones in Crow Pose.
- Getting your feet off the ground may be a thrilling experience and a huge accomplishment. So much so that it's easy to forget to keep lifting the feet once they're up. The feet dangle and get heavier until they fall back to the mat, which is a normal misalignment. Squeeze the big toes together as you lift your feet toward the buttocks. When it's time to lower, use your back muscles and spine to gently lower your toes onto the mat, then shift your weight back into your feet. The more core strength required, the quieter and slower the change.
- The gaze is drawn back to the feet, which is beneficial for forwarding rolls but not so much for Crow Pose. Alternatively, the gaze is directed straight down at the mat, which increases the risk of falling forward and injuring muscles and joints. Move your gaze forward about 3 feet in front of your hands. If you're afraid of falling, practice falling and getting back up with a pillow or two in front of your hands.
Yogapedia YogBela's Channel -
We have pāda, which means leg, and hastā, which means hand. Pdahastsana is standing and bending forward.
Pdahastsana or Standing Forward Bend mobilizes the body's joints and extends the spine, making it more elastic. It stimulates the neurological system and boosts the blood supply to the brain. The removal of abdominal fat results in a feeling of lightness. Leg and back muscles are stretched and strengthened, and both physical and mental balance is enhanced. Standing Forward Bend practice provides eternal youth.
This position activates the vādhiṣṭhāna cakra and releases energy in the main nāḍīs (astral tubes) along the spine.
Step by step:
- Stand in Tadasana with your hands on your hips (feet together or hip-width distance apart). Exhale and bend forward at the hip joints rather than the waist. Draw the front torso out of the groins and widen the area between the pubis and top sternum as you descend. As with all forward bends, the emphasis is on stretching the front torso as you enter into the posture more fully.
- Bend forward, keeping your knees straight, and lay your hands under your feet (palms facing up), bringing your toes to meet your wrist.
- Straighten your arms and lift your front torso away from your thighs with each inhalation, making your back as concave as possible. Exhale and stretch down and forward, bending your elbows out to the sides to frame your head. Draw the shoulder blades down the back, leaving room between the shoulders and the ears. Lift the sitting bones toward the ceiling, keeping the weight equally distributed through the feet. Slightly inward turn the top thighs.
- Lift and lengthen the front torso somewhat with each inhalation; release a little more fully into the forward bend with each expiration. The torso oscillates nearly slightly with the breath in this manner. Allow your head to hang from the root of your neck, which is located deep between the shoulder blades in the upper back. Hold the position for a total of 20 seconds.
- Release the hands to come out of the posture. Inhale as you bring your hands to your hips and rise up with a flat back.
Beginner’s Tip: Starting with bent knees, place hands beneath the feet, palms facing up, toes contacting the wrist. Lift the buttocks and hamstrings as much as possible to straighten the legs.
Common Mistakes
Ensure that your fold comes from your pelvis, deepening the hip creases, rather than your back. A bent spine that hangs over your legs is the result of a backward fold. Imagine your pelvis as a bowl of water instead. To tip the water out of the front side, rotate the pelvis forward. You can now fold deeply in a safer manner.
Sivananda yoga classes in Brussels & online - WordPress.com Adiyogam's Channel - Stand in Tadasana with your hands on your hips (feet together or hip-width distance apart). Exhale and bend forward at the hip joints rather than the waist. Draw the front torso out of the groins and widen the area between the pubis and top sternum as you descend. As with all forward bends, the emphasis is on stretching the front torso as you enter into the posture more fully.
-
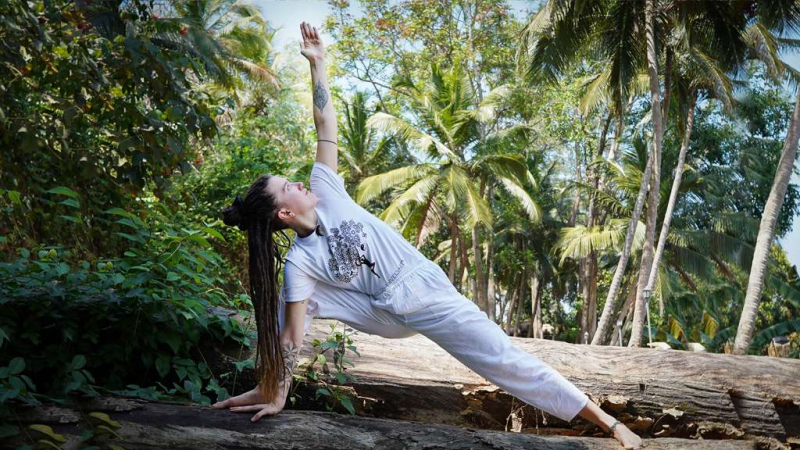
Trikonasana is a basic yoga stance that can assist both your physical and mental health, whether you're new to yoga or an experienced practitioner. Trikonasana, often known as the triangle pose, is a yoga standing pose that strengthens and lengthens the hamstrings and groin while also stretching the hips and opening the shoulders. "Trikona" means "triangle" in Sanskrit, while "asana" means "position." The fundamental stance gets its name from the triangle shape your body forms as you put your bottom hand to the floor while keeping your feet stable.
Trikonasana, like many other yoga positions, has a number of health and mental benefits. Trikonasana helps you maintain balance and stability by activating your core muscles. This pose can help to loosen tightness in the spine and back, allowing for more flexibility. Trikonasana increases mobility and reduces injury risk by unlocking the hip flexors and shoulders. Perform this stance on both sides to benefit the right and left hips equally.
Trikonasana activates your core and upper body, potentially increasing your metabolism by stimulating your digestive organs. Trikonasana is a yoga pose that focuses on the lower back, which is where some individuals store their stress. This pose can assist relieve tension, which can lead to less anxiety and a more stable emotional state.Step by step:
- It's easier to enter from Warrior II because your feet are already in the right place. For this transition, you shouldn't need to widen or restrict your stance. Straighten your front leg from Warrior II onwards (the right leg in this case).
- Draw your right femur into its socket by engaging your right thigh muscles. Keep your right hip tucked and extend your right hand toward the front of the room.
- Your right hand should be lowered onto your shin or ankle. Bring your right hand to the floor on the inside or on the right foot if you're more open. Choose the option that feels most natural to you.
- As you open your chest and raise your left fingertips toward the ceiling while keeping your left shoulder anchored in its socket, the left shoulder stacks on top of the right.
- Move your eyes up to your left fingertips by turning your head. It's also good to retain the head in a more neutral position if this is bothersome for your neck.
- Continue to pull the muscles in your right thigh upward, increasing the furrow in your right hip.
- To avoid hyperextension, gradually soften your right knee. (This is referred to as a micro bend.)
- Stay in this position for at least 5 breaths.
- Rep the stance, this time bringing your left leg forward.
Beginners’ tips:
- To keep both sides of your waist long, place your hand on a block on the inside or outside of the foot, depending on what feels best for your body.
- The press-rebound effect is achieved by pressing hard through the feet to make your upper body feel lighter.
Common Mistakes
- On getting your right hand to the floor, resist the impulse to bend your right knee. It's more vital to keep your right leg straight. Another alternative is to place a block on the floor under your hand.
- Avoid resting your hand directly on your knee since this puts too much strain on the joint. Also, make sure the right heel is aligned with the left foot's arch.
keralatourism.org VENTUNO YOGA's Channel