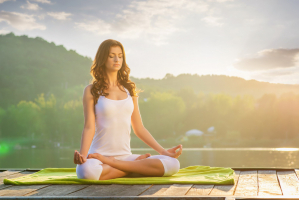
Top 6 Yoga Poses for Better Digestion

Yoga is probably a very popular exercise with everyone. Not only that, yoga is also very good for your health, especially the digestive system. Consider giving ... read more...these yoga poses a digestive benefit the next time you're experiencing digestive upset. These postures for digestion can help relieve pain after a hot flash, help with discomfort, or as a preventative if you have digestive issues. Any of these six yoga poses for better digestion and bloating is sure to help you feel your absolute best.
-
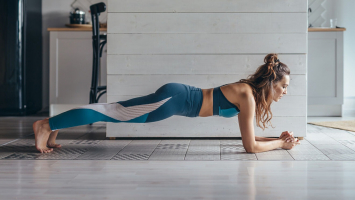
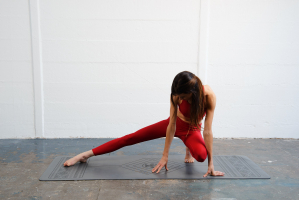
The twist is a pose in which the spine and body are turned in the same direction. Twisting is an excellent approach to developing your core muscles while also expanding the range of motion in your spine. Twisting is an excellent neutralizing pose that helps balance the body after a sequence of back bends or forward bends.
The spirals travel deep into the body's core, eliminating poisons from the internal organs and replacing them with oxygen-rich blood. The helix has the potential to create space in the hips, spine, and shoulders. They can also help you improve your muscle coordination and balance. Your core will be activated, and everything will be moved into your digestive tract. Twisting is a beginner-friendly yoga pose that can help reduce congestion pain. It will engage your core and get your digestive tract going. The twist is one of the yoga poses for better digestion.
Step by step:
- Kneel to your chest with both knees bent.
- Keep your left leg parallel to the ground as you cross your legs to the left.
- Turn your head to the right and extend your arms into a "T" position.
- Stay in this position for at least 30 seconds.
- Using your core, bring your knees back to the center and repeat on the opposite side, this time rotating your head to the left.
- On each side, repeat this process 2-3 times.
Beginner’s Tips:
- Position your body in a plank with your feet hip-width apart.
- Start shifting your weight to one side.
- Move your body from side to side until a stretch is felt.
- Repeat for five minutes twice a day, or until you can do it for 10-15 minutes without stopping.
During the activity, keep the following points in mind:
- These positions should be avoided by people who have persistent back discomfort, a back injury, or degenerative disc disease. You should only attempt to practice them under the supervision of a skilled and experienced instructor.
Source: Yoga With Adriene's Youtube Chanel Source: Christians Do Yoga's Youtube Chanel -
Knees-to-chest is a basic grounding pose that relaxes the body and calms the mind. The knee-to-chest stance is a great anti-back stretch. Constipation, irritable bowel syndrome, and gas are among the digestive issues it alleviates. If you have gas accumulation or abdominal pain, the knee-to-chest stance, commonly known as the "wind-down" pose, maybe for you. It will help to relieve pressure in your stomach and intestines. Knees To Chest is considered one of the yoga poses for better digestion.
Step by step:
- Inhale, then exhale, hugging your knees to your chest as you exhale.
- Swing your knees from side to side, creating tension in your lower back and abdomen.
- Hold this position for 5-10 breaths before lowering your knees to the ground slowly.
- Rep 2-3 times more.
Beginner's Tips:
- Stretch your spine to the end of your tailbone on the floor. Resist the urge to elevate your buttocks and hips off the mat. Drawing your knees tightly to your chest is less significant than having a longer spine.
- Place a firm blanket beneath your head if you are experiencing discomfort in your head or neck.
During the activity, keep the following points in mind:
- If you're recovering from abdominal surgery or a hernia, this stance isn't for you. If you have a spinal, knee, or hip ailment, you should avoid this pose.
- Do not raise your head if you have a neck injury.
- After the first trimester, pregnant women should avoid doing this pose. Always stay within your capabilities and restrictions. Before doing yoga, see your doctor if you have any health issues.
Source: Virginia Mason's Youtube Chanel Source: Vive Health's Youtube Chanel -
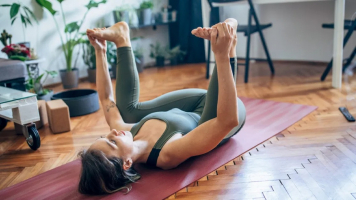
The Happy Baby Pose is a soothing and pleasant pose that is good for extending the body and improving calm. The Happy Baby Pose is a simple pose that is perfect for beginners. This is an easy-to-digest yoga stance that allows you to straighten your legs and arms while remaining gentle on your body. In this yoga stance, your abdomen will be able to relax.
Step by step:
- On the floor or a mat, lie flat on your back.
- Bend your knees at a 90-degree angle toward your chest with your head flat on the mat. Turn your feet up toward the ceiling with the soles of your feet facing up.
- Grab and grasp the inside or outside of your foot as you reach forward. Shift your knees toward your armpits by spreading them apart.
- Gently rock from side to side while flexing your heels into your hand (like a happy baby). Hold this position for many breaths, deeply inhaling and expelling.
Beginner's Tips:
- If you can't easily support your feet with your hands, consider looping a yoga strap around the middle arch of each foot.
During the activity, keep the following points in mind:
- This pose is not suggested if you have a neck or knee injury due to the nature of the stance. It is also not advised for women who are pregnant.
- Although yoga is healthy for pregnant women, this particular position is not recommended after the first trimester. It entails reclining on your back, which may limit fetal circulation.
Source: MellS StressLess's Youtube Chanel Source: VENTUNO YOGA's Youtube Chanel -
Many yoga practitioners have chosen the seated forward fold as a foundational position. However, stretching the upper half of your body in relation to the bottom half of the person seated can assist you to stretch your entire back and develop your physical flexibility. Folding inward in this manner also has a calming effect on the mind. If you're expecting or frequently suffering stomach issues, the forward bend is a helpful warm-up. It lets you and your stomach to relax, preventing your digestive tract from being affected by stress. Seated Forward Fold is considered one of the yoga poses for better digestion.
Step by step:
- Begin by sitting on the edge of a folded blanket in Dandasana (Staff Pose). Press your hands or fingertips into the floor beside your hips, pressing your heels away from your body.
- Inhale. Exhale and lean forward from your hips, keeping your front torso long. Without rounding your back, lengthen your spine to fold toward your legs.
- Walk your hands as far as they will go along the outside of each leg. Hold the sides of your feet with your hands if you can reach them.
- Lift and stretch your front torso somewhat with each inhalation; release a little more fully into the forward bend with each exhalation. Bend your elbows out to the sides and pull them away from the floor if you're holding your feet.
- For 1–3 minutes, stay in the stance. Release your feet to rise. Inhale and draw your tailbone down and into your pelvis to elevate your torso.
Beginner's Tips:
- Resist the impulse to lower your head and shoulders toward your shins, as this will cause your upper back to round. Pascimottanasana keeps the back flat.
During the activity, keep the following points in mind:
- Beginners Make Common Forward Bend Mistakes Allowing The Knees To Open Away In The Bend Person Forward Is A Common Mistake For Beginners. The knee and hip move outwards to try to relieve the stretch, which generally suggests an overstretched hamstring.
Source: Landon Slaughter's Youtube Chanel Source: Yoga Lifestyle with Melissa's Youtube Chanel -
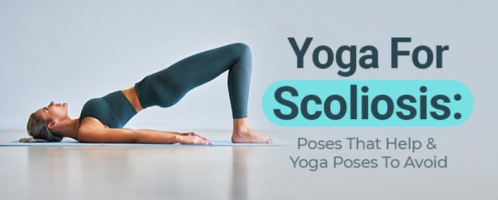
Bridge pose can help you improve your posture and offset the consequences of sitting for lengthy periods of time. This pose can help with low back pain, sag, and curvature (abnormal curvature of the spine). This posture stretches the abdomen, chest, and shoulder area while strengthening the back, glutes (buttocks), thighs, and ankles.
The comfort in the waist area is a major feature that you will notice right away. In fact, persons who suffer from herniated discs frequently adopt this position. The pose helps relieve pressure from a slipped or herniated disc by gently moving the disc in the opposite direction of the pain. Digestive problems can cause a lot of heat in your back, producing pain and discomfort. This yoga stance can help reduce pain and pressure while also providing an energy boost.
Step by step:
- Lie down in the center of the mat on your back, knees bent, legs and feet parallel, and hip distance apart.
- Bring your feet up to the level of your buttocks. Inhale as you lift your hips from the pubic bone rather than the navel, pressing down firmly through both feet.
- Place your hand palms down on the floor or clasp your hands behind your back on the floor. Get on top of your shoulders and broaden your collarbones. Roll your upper thighs inside and firm the outer shins. Keep your thighs parallel and press down forcefully through your heels to lift the back of your thighs and the bottom of your buttocks even higher.
- To complete, let go of your hands and lower yourself to the floor while exhaling. As you observe the spaciousness within your chest, allow your back to rest in a neutral position.
Beginner's Tips:
- Place a block between your knees and keep it there firmly as you raise and lower your hips to engage your inner thighs and glutes.
- Work on raising up into the bridge with control over time. Before holding the pose for a few breaths, you might want to practice coming in and out of it a few times.
- As you move upwards, keep an eye on your knees and make sure they don't fall out wider than your feet. If this happens, try squeezing a yoga block between your thighs as you rise.
- If you're having trouble maintaining your pelvic lift, place a block or bolster beneath your sacrum and rest your pelvis on it for support. If you want to deepen the stretch, lift your heels off the floor and press your tailbone up towards the pubis while you're in bridge posture. Stretch the heels back to the floor once the tailbone has been elevated.
During the activity, keep the following points in mind:
- People with knee, back, or neck trouble should avoid the Bridge Pose unless they have first sought medical advice. It's critical that your shoulder blades, not your neck, bear the brunt of your weight.
- To prevent slipping on the floor and relieve pressure on the neck and shoulders, a folded towel or yoga mat should be placed beneath the shoulders.
- You can also interlace your fingers, lay them under your buttocks, and press them down into the mat while doing a bridge pose. This will improve the level of stability.
Source: SouthCarolinaETV's Youtube Chanel Source: Mind Body Soul's Youtube Chanel -
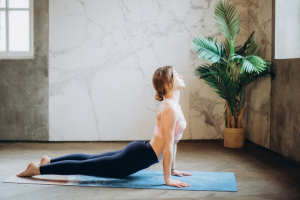
Cobra pose is frequently used in the Sun Salutation. For novices, it's a substitute for Upward Facing Dog in the Vinyasa series. However, it's also a powerful back crunch in its own right, so you should do this pose independently. This is a popular pose for lengthening the spine and putting pressure on the stomach, which can help with digestive disorders. Digestion is aided by gentle pressure. Cobra pose is considered one of the yoga poses for better digestion.
Step by step:
- Placing your palms flat on the ground right beneath your shoulders is a good place to start. Straighten your elbows and hug them into your sides.
- Pause for a second with your neck in a neutral position, looking straight down at your mat. Your pubic bone should be anchored to the floor.
- Lift your chest off the floor with an inhale. Keep your low ribs on the floor and roll your shoulders back. Ensure that your elbows are still hugging your sides. Allowing them to fly out to either side is not a good idea.
- Maintain a neutral neck. Don't turn it up all the way. Your eyes should be fixed on the ground.
Beginner's Tips:
- Reduce the height of the position if you experience any discomfort or compression in your lower back. Instead, concentrate on building strength in the upper back, namely between the shoulder blades.
During the activity, keep the following points in mind:
- It's critical to keep your hands aligned beneath your shoulders. The resulting angle will raise your shoulders up by your ears if your hands are too far away from your torso.
- Also, avoid straightening your arms to the point where your elbows are locked. Feel free to bend your elbows slightly or keep your arms at a 90-degree angle. Elbows should be angled backward rather than out to the sides. This is a technique that uses your back muscles rather than your arms.
- Because the lower back is more flexible than the upper back, you may find that you have greater flex in that area. Attempt to maintain a consistent curve throughout your entire back.
- Do not extend your neck too far backward. It will be arched, yet it will be a natural extension of the upper spine.
Source: Back Intelligence's Youtube Chanel Source: RosalieYoga' Youtube Chanel