Top 7 Tips to Prevent Your Mac's Storage from Getting Full
If you're using a Mac instead of a Windows device, you might assume that your Mac's memory will never run out, especially if it's new. However, as time goes ... read more...by, you might need to download several applications and documents for work, study, or entertainment purposes, which can rapidly fill up your Mac's memory. This can lead to your memory space getting full and your Mac's performance slowing down. Therefore, it's crucial to manage and free up memory on your Mac to maintain optimal performance. To assist you in solving this issue, Toplist has put together some tips that you can follow.
-
Do you know about hard drives specifically for Macs? If not, Toplist will explain more clearly to you about the hard drive. A hard drive is a separate, external device that helps you back up data on your Mac. Even files or images in internal memory or hard drives can still be used for backup.
Simply purchase a hard drive along with a cable to connect to your Mac's port to conveniently back up photos, videos, and important data. In addition to supporting study and work, the hard drive will also support entertainment such as storing your favorite games, movies, or other large files that you do not need in a short time.
We recommend using an SSD for your Mac because it's more convenient and runs faster. Some operations you need to do when using a hard drive to back up Mac data include:
- Choose an external hard drive that suits your needs.
- Connect the external hard drive to an available USB or Thunderbolt port on your Mac.
- Format the external hard drive, by going to Applications > Utilities > Disk Utility, select the external drive, and choose the "Erase" option. Format it as "Mac OS Extended " or use the newer APFS format if your Mac supports it.
- Transfer files to an external drive by dragging and dropping them into Finder. (Note: If your external drive hasn't been formatted for macOS, you may need to format it. Please note that this will erase all data on the drive, so back up any important files).
- To format the drive, go to Applications > Utilities > Disk Utility, select the external drive, and select the "Erase" option. Format it as "Mac OS Extended (Journaled)" or use the newer APFS format if your Mac supports it.
- Transfer files to an external drive by dragging and dropping them into Finder.
- To configure where your data is stored, you need to: select Finder > Preferences > Sidebar and check the external drive box under "Devices".
- Eject an external drive properly: Click the eject icon next to the drive name in Finder.
Note: Always make backups of your external drive

Image by Andrew Neel via pexels.com 
Image by George Milton via pexels.com -
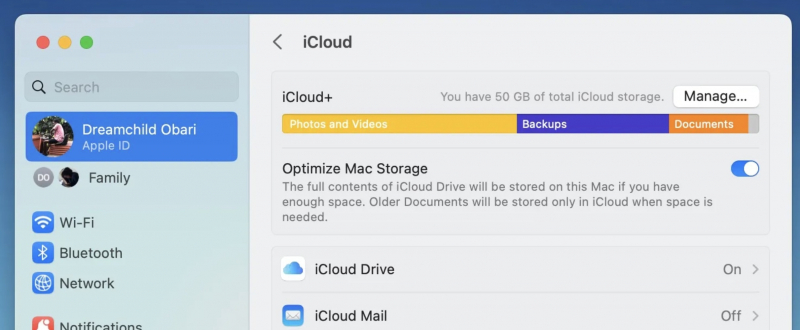
On a Mac, you need to set up an additional Apple ID to use iCloud storage. This is a cloud storage service integrated with Apple that you can use to store files and free up space on your computer's storage. So I advise you to limit and use iCloud sparingly so that your Mac doesn't run out of memory. To limit it, you can adjust to iCloud's space-saving feature.
Proceed as follows:
- Select System Settings
- Click your Apple ID name at the top of the left pane.
- Select iCloud > select Optimize Mac Storage
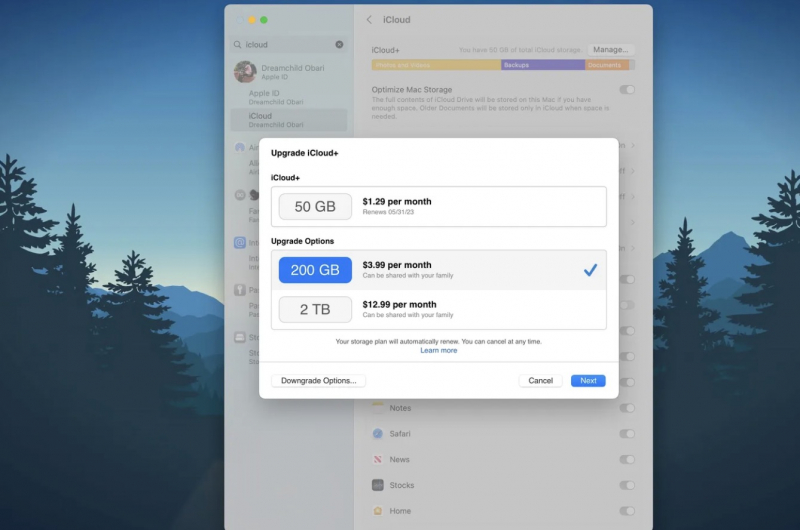
iCloud only gives you 5GB of free storage, but if you want more space than 5GB you can upgrade your iCloud storage plan as the size of your files in the cloud increases.
When your iCloud storage is almost full, follow these steps:
- Go to System Settings > Apple ID > iCloud and click Manage on the right.
- Click Change Storage Plan and select your preferred plan.
- Click Next and proceed with payment according to the instructions.
- Of course, when you choose a package, it is equivalent to the amount you have to pay monthly to maintain memory capacity.
-
Nowadays, there is a trend of downloading movies, pictures, and videos to phone memory. Downloaded data can be uploaded by Mac to cloud storage such as Google Drive or Mac's storage file, allowing you to view it online without the network at any time.
Creating an email and registering on Google Drive is very convenient and saves a lot of Mac space, ensuring videos have sharp images and free storage. So this is the way that you are entitled to enjoy and put into practice.

Stream Instead of Downloading 
Image by Antoni Shkraba via pexels.com -
To save Mac space, you should also turn off application updates. Some applications will stay the same size when updated, while some updates may overload over time, causing the device to freeze or run slower. Therefore, to be cautious, you should turn off automatic updates and make a habit of checking the size of the app update on the App Store before downloading it.
Here's how to turn off automatic updates for apps on your Mac:
- Open the screen > click on the App Store icon on the Dock.
- Mouse up to the menu bar > select App Store.
- Select Settings > uncheck Automatic Updates in the resulting menu.
Image by Pixabay via pexels.com 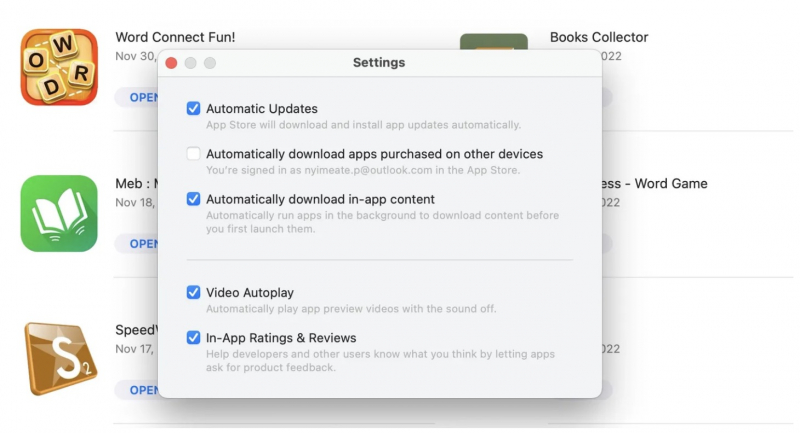
Disable Automatic Updates -
If your Mac is running out of space, uninstalling useless apps can help free up some space. It's possible that you may hesitate to delete some game applications that you downloaded ages ago, but if you're not using them now, then removing them can help you create more space for new files and applications.
Please pay attention to small applications that you think don't use Mac space, but in fact, they still take up space even when you don't access them. So, deleting small applications is also necessary.

Image by Pixabay via pexels.com 
Image by Brett Jordan via pexels.com -
There are many files on your Mac, which also causes the Mac storage to become full. To prevent that, you should use file compression, and always remind yourself to compress large files to get more Mac space.
Here's how to do it on Mac:
- Control-click on the document, selects Compress to compress it, and open the document to expand.
=> You just need to do that to successfully compress the file. You can also refer to good file compression tools specifically for macOS such as Archiver 4, WinZip, BetterZip 5, Keka.

Image by Anna Shvets via pexels.com 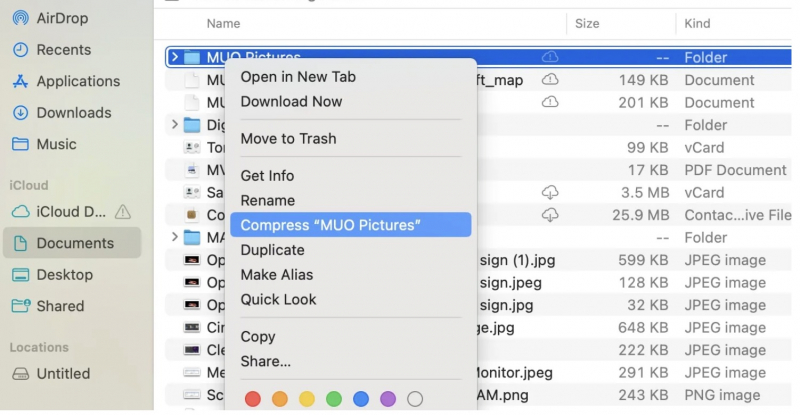
Compress Large Files - Control-click on the document, selects Compress to compress it, and open the document to expand.
-
Finally, you need to pay attention to whether you buy a Mac that is suitable for your intended use. If you need to do a lot of work related to a large number of documents, video editing, or image design, you should buy a Macbook Pro. If you use it for surfing the web, typing documents, reading newspapers, or studying at university, then MacBook Air will be a good choice for you.
Apple has always been a brand that gives buyers options to choose Macs with more storage capacity as long as they are willing to spend the purchase cost.
You should also always monitor your Mac's memory by going to General > Storage in System Settings. Or download the CleanMyMac X app to remind you when your Mac is low on space.
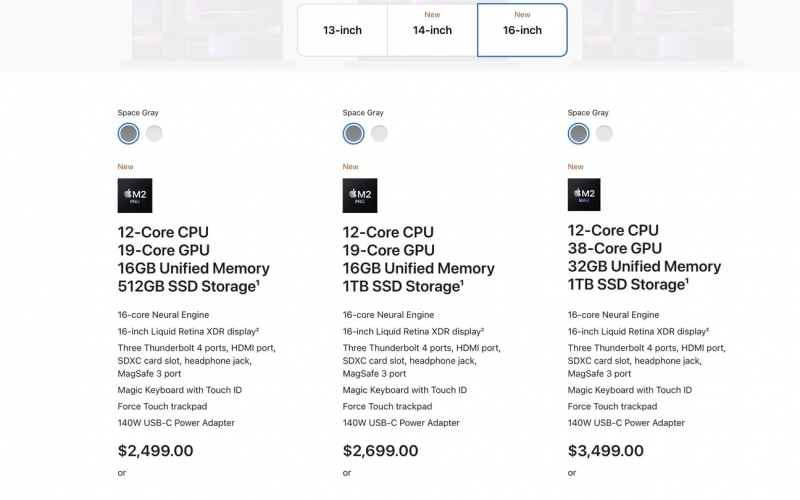
Get a Mac with More Storage 
Image by Christina Morillo via pexels.com


