Top 5 Recycle Bin Settings on Windows 11 You Should Know

The Recycle Bin, a virtual storage area where deleted data are momentarily kept before being permanently removed, is one such essential function. Comprehending ... read more...and customizing Windows 11's Recycle Bin settings might assist you in efficiently handling your erased files and retrieving them when required. Toplist will look at all of the Recycle Bin options in this post so you can get the most out of Windows 11 and protect your data.
-
The recycle bin is a storage location in Windows where deleted files are temporarily stored before they are permanently deleted. To delete files permanently from the recycle bin, you can either right-click on the recycle bin icon on your desktop and select "Empty Recycle Bin," or you can open the recycle bin and click on the "Empty Recycle Bin" button in the toolbar. Your files are not permanently stored in the Recycle Bin.
When using Windows, the Recycle Bin is automatically set up to hold files that you remove, taking up a specific percentage of the partition's capacity. When the space allotted for new files is filled, older files will be automatically removed. You should exercise caution when deleting large files if you frequently do so in the hopes that you can always recover them from the Recycle Bin. In the unlikely event that you frequently need to recover files from the Recycle Bin, you may also alter the amount of storage space set aside for deleted items.
- You can change the reserved storage capacity from the Recycle Bin properties. Right click on Recycle Bin and select Properties. Click on C drive and find the Maximize size field.
- Now, let's determine the specific size in MB to adjust the reserved capacity. Remember that 1GB is equivalent to 1024MB, so you will need to do a little mental math if you want your Recycle Bin to store files in gigabytes.
- When you're done, click OK to save and exit.
Increasing or decreasing the storage capacity in the Recycle Bin on Windows 11 offers several advantages:
- Efficient storage management
- Customization to your needs
- Enhanced data recovery
- Flexibility for different drives
- Real-time adjustments
By taking advantage of the option to increase or decrease the storage capacity in the Recycle Bin on Windows 11, you can effectively manage your deleted files, optimize disk space usage, and improve data recovery capabilities. It is one of the recycle bin settings on Windows 11 you should know.

Image via greenmatters.com 
Image via greenmatters.com -
You can skip this extra step and configure the file to be erased immediately if you are the type of person who never needs to retrieve deleted files. To do this, there are two methods:
- First, you can simply use the Shift + Delete keyboard shortcut to permanently delete files without putting them in the recycle Bin.
- Second, you can change the Recycle Bin settings so that even if you delete files without using the shortcut, the files will be permanently deleted.
You can do this from the Recycle Bin properties. Right click on Recycle Bin and select Properties. Check the option next to the text that says Don't move files to the Recycle Bin. Remove files immediately when deleted. Click OK to save and exit. Now, when you delete an item, it's permanently removed immediately instead of sitting in the trash. Permanently deleting files without sending them to the Recycle Bin offers several advantages:
- Enhanced data security
- Efficient disk space management
- Streamlined file deletion process
- Prevention of accidental file restoration
- Avoiding clutter and organization
It's important to note that when you delete files without using the Recycle Bin, they are typically not recoverable unless you have a backup. That is one of the recycle bin settings on Windows 11 you should know. Therefore, exercise caution when permanently deleting files and make sure you have a backup strategy in place to prevent data loss.
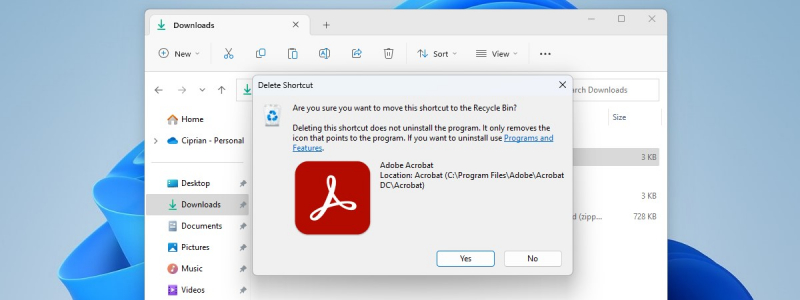
Image via digitalcitizen.life 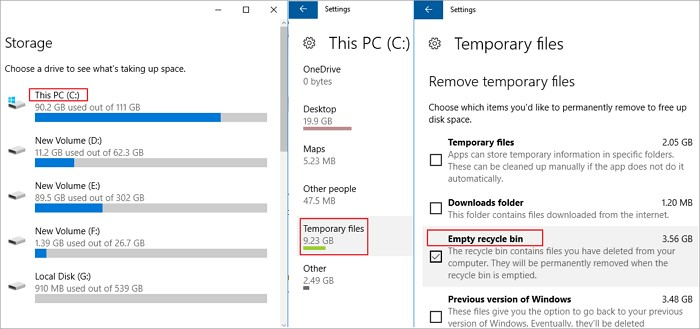
Image via digitalcitizen.life -
To ensure that you don't accidentally remove crucial files from your computer, you can enable confirmation. A preventative measure against inadvertent file deletion is to enable confirmation prompts prior to file deletion. It adds an additional step whereby you must verify that you really want to delete a file before it is erased forever. This reduces the risk of accidental clicks or keystrokes leading to irreversible data loss. This is particularly true if you have configured your Recycle Bin to permanently delete files that are never placed in the Recycle Bin.
- You can enable confirmation from the Recycle Bin properties. Right click on Recycle Bin and select Properties. Check the box next to the text that says Display delete confirmation dialog.
- Select OK to save and exit.
- Note that you can still permanently delete files with keyboard shortcuts whenever you need.
Turning on confirmation before deleting files offers several advantages:
- Prevention of accidental file deletion
- Error prevention and peace of mind
- Time to reconsider file deletion
- Protection against malicious actions or malware
- User control and customization
By turning on confirmation before deleting files, you can mitigate the risks of accidental data loss, provide an opportunity for reconsideration, and enhance your overall control and peace of mind when managing your files. It is one of the recycle bin settings on Windows 11 you should know. The storage size of the recycle bin depends on the settings configured in Windows. By default, it reserves a percentage of your total storage capacity, but you can adjust this value in the recycle bin properties.
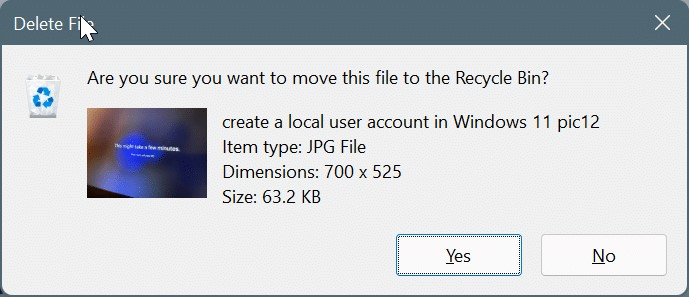
Image via windowsloop.com 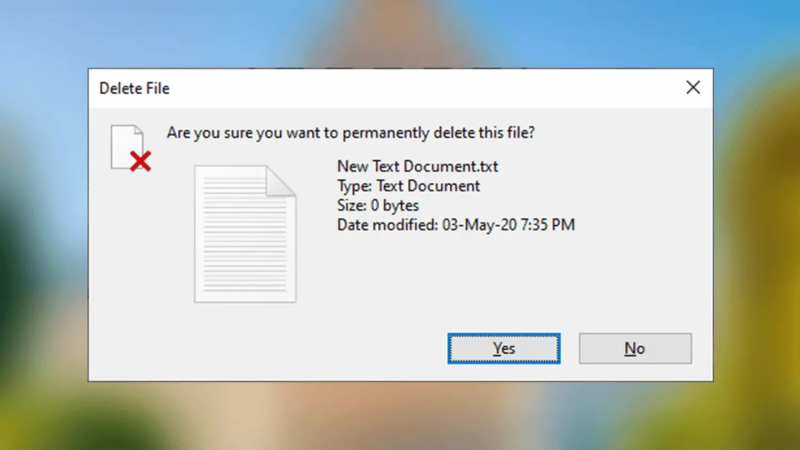
Image via windowsloop.com -
Storage Sense is a fantastic feature included in Windows 10. Storage Sense can take care of cleaning your Windows system. It essentially functions, at least partially, as a substitute for outside utilities like CCleaner. You can use Storage Sense to set up the Recycle Bin to automatically empty after a predetermined number of days if you're running Windows 10 or 11. Files in the Recycle Bin can be scheduled by Storage Sense to be deleted after 1, 14, 30, or 60 days.
Setting a different number of days for every file is not feasible. Every thirty days, every file in the bucket will be removed. For instance, all files in the trash the following day—including the ones you removed today—will be gone if the last cleanup was completed 29 days ago.
- You can set up Storage Sense from the Settings app. Press Win + I to launch Settings and navigate to System > Storage > Storage Sense.
- Look for the option called Delete files in my recycle bin if they have been there for over and select the number of days. The default value is set to 30.
Adding the Recycle Bin to the system tray on Windows offers several advantages:
- Easy access to the Recycle Bin
- Efficient file management
- Visual indicator of deleted files
- Customization and control
- Streamlined desktop appearance
By adding the Recycle Bin to the system tray, you can enjoy easy access, efficient file management, customization options, and a streamlined desktop appearance. That is one of the recycle bin settings on Windows 11 you should know. It enhances the overall user experience and simplifies the process of managing and restoring deleted files on your Windows system.
Image via windowsloop.com 
Image via windowsloop.com -
If you accidentally delete a file and want to recover it, you can open the recycle bin, locate the file you want to restore, right-click on it, and select "Restore" to return it to its original location. If you are a heavy user of the Recycle Bin, accessing the desktop or searching for the Recycle Bin in the Start Menu every time you want to open it can be annoying. Luckily, you can put the Recycle Bin in your system tray and access it directly, eliminating unnecessary steps. There is no built-in option to add the Recycle Bin to the system tray on Windows. You will need to rely on third-party tools like TrayBin or MiniBin. Here's a general process to add the Recycle Bin to the system tray using a third-party tool:
- Research and download a reliable third-party software that allows you to add the Recycle Bin to the system tray. Examples of such software include "RBTray" or "MiniBin."
- Once you have downloaded the software, locate the installation file and run it.
- Follow the installation instructions provided by the software. Typically, you will need to agree to the terms and conditions and choose the installation location.
- After the installation is complete, the software may launch automatically or provide instructions on how to launch it.
- Look for the software's icon in the system tray. It may resemble a small trash can or a Recycle Bin icon.
- Right-click on the software's icon in the system tray to access its settings or options.
- In the settings or options menu, look for an option to add the Recycle Bin to the system tray or enable system tray integration.
- Enable the option to add the Recycle Bin to the system tray.
- Once enabled, you should see the Recycle Bin icon appear in the system tray.
- You can now click on the Recycle Bin icon in the system tray to access and manage your deleted files.
Adding the Recycle Bin to the system tray on Windows can offer several advantages:
- Quick and easy access
- Efficient file management
- Visual indicator of deleted files
- Customization and control
- Streamlined desktop appearance
The Recycle Bin's addition to the system tray improves accessibility, streamlines file management, gives users visual signals, allows for customisation, and keeps the desktop environment tidy. These benefits can help you deal with deleted files on your Windows system in a more effective and simplified manner. By default, Windows displays a delete confirmation dialog when you try to delete files, asking you to confirm the action. This dialog helps prevent accidental deletions by providing an extra step before files are removed.

Image via techviral.net 
Image via techviral.net