Top 7 Best Ways to Save Disk Space in Windows

Disk space is a valuable resource that can affect the performance and functionality of your computer. If you are running low on disk space, you may encounter ... read more...problems such as slow speed, frequent crashes, or inability to install new programs. In this article, Toplist has brought to you some of the best ways to save disk space in Windows and free up some room for your important files and applications.
-
Storage Sense is a valuable Windows feature that streamlines file management for users. Designed to optimize both offline and online storage, it automatically clears away clutter, such as temporary internet and app files, empties the Recycle Bin, and more. By regularly performing these tasks, it liberates valuable disk space and ensures your system runs efficiently.
Enabling Storage Sense is a simple process:
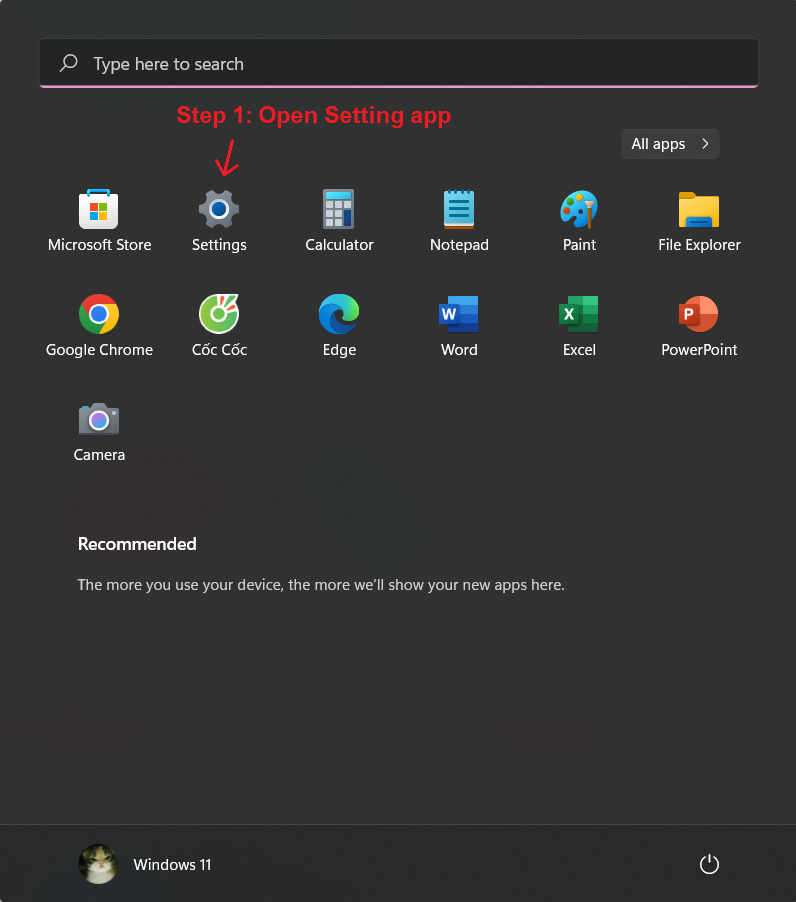
- Launch the Settings app on your Windows computer.
- Navigate to System > Storage > Storage Sense.
- Toggle the switch to "On"
Storage Sense 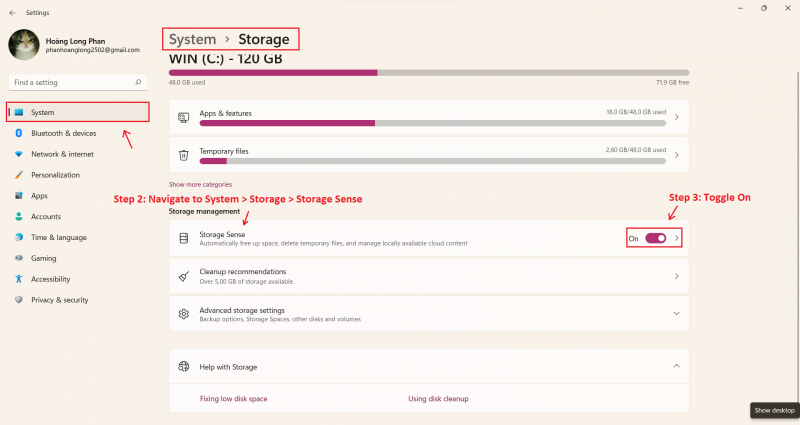
Storage Sense -
When updating to a new version of Windows, the operating system cleverly retains data from older versions, providing an essential safety net. This safeguard allows you to revert to a previous version if you encounter compatibility issues or glitches, ensuring you're not stuck with a problematic Windows version. However, this precaution comes at a cost: it consumes a substantial amount of disk space.
The good news is that you can free up space by removing old Windows update files. Doing so not only reclaims valuable storage but also enhances system performance. It's a prudent practice to occasionally clean up these outdated files, striking a balance between maintaining system flexibility and maximizing your computer's storage efficiency.
Remove Windows Old Versions 
Remove Windows Old Versions -
Did you know that Windows offers a feature called NTFS Compression, allowing you to selectively reduce the size of individual files and folders without affecting how you use them? This can be a better option than using a tool like 7-Zip for compressing and decompressing files when needed.
To use NTFS Compression:
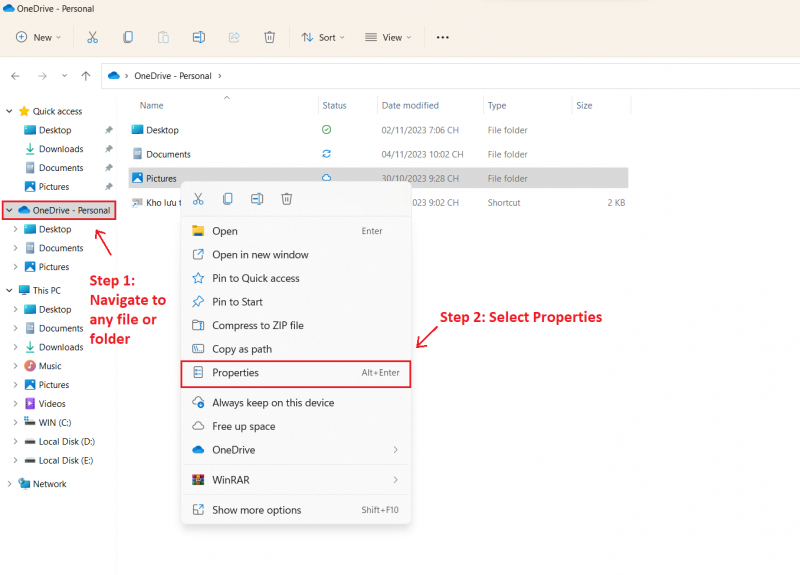
- Open File Explorer (press the Windows key + E) and locate the file or folder you want to compress.
- Right-click on the file or folder, and choose Properties.
- In the General tab, click on Advanced.
- Check the box that says "Compress contents to save disk space".
- Click OK.
It's important to note that NTFS compression comes with a trade-off. While it reduces disk space usage, accessing compressed files and folders may require more CPU processing because they need to be decompressed. The exact impact varies depending on the file type, but on modern systems with fast CPUs, you likely won't notice a significant performance drop.
Toplist recommends using NTFS compression for files you don't access frequently, such as backup documents or reference materials. Avoid using it for audio and video files, as they are usually already compressed. Never use NTFS compression for system files or folders.
NTFS Compression 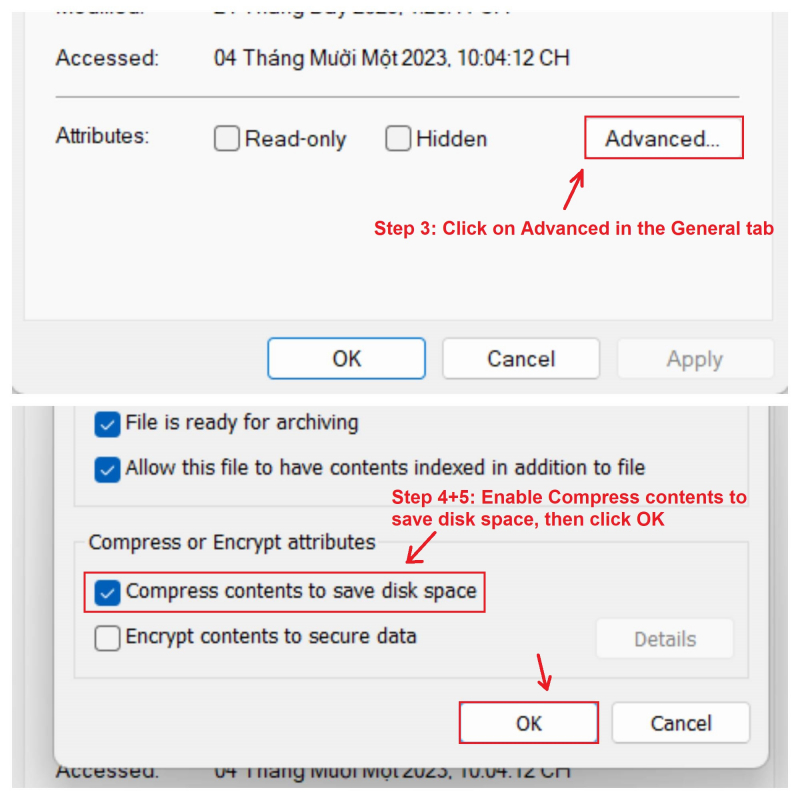
NTFS Compression -
The initial significant update for Windows 10 or 11 brought a new feature that allows you to install Windows Store apps on external storage devices like USB drives, SD cards, and external data drives. While many of the default Windows apps may not be impressive, there's a wide array of excellent Windows Store apps worth exploring.
This feature also extends to media files such as images, audio, and videos, which can help free up considerable space on your primary drive. However, before you proceed, ensure that you've connected an external storage device and configured media redirection:
- Open the Settings app.
- Go to System > Storage > More storage settings.
- Click on "Change where new content is saved".
- For the specific file types you wish to redirect, switch the storage location from "This PC" to the name of the plugged-in external storage device.
- Click "Apply" to confirm and save your changes.
Apps and Media on External Storage 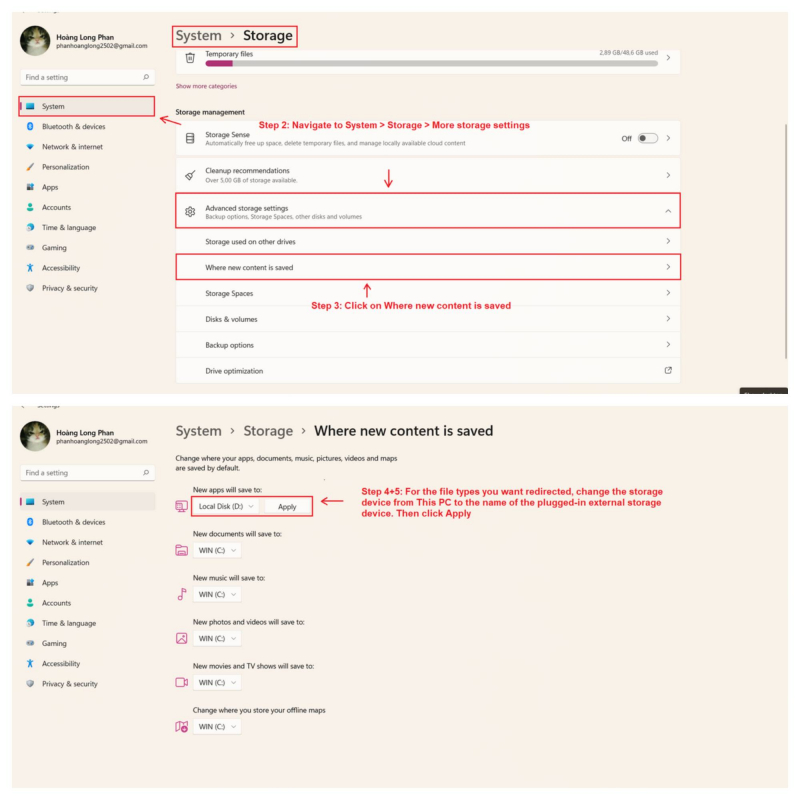
Apps and Media on External Storage -
You might not be utilizing OneDrive - it's not very popular. However, it's worth reconsidering this. Microsoft provides a free plan with a total capacity of 5 GB, but if you have a Microsoft 365 subscription, you get a generous 1TB of storage space.
To maximize your OneDrive capacity, it's advisable to deactivate all synchronization options, turning it into a distinct storage feature:
- In the system tray, right-click on the OneDrive icon and choose Settings.
- Under the Account tab, click on "Choose folders".
- Deselect the folders you prefer not to sync.
- Click OK.
You can manage your files through the desktop app or access them online. Beyond just saving disk space on Windows, OneDrive offers more functionality.
Cloud Storage 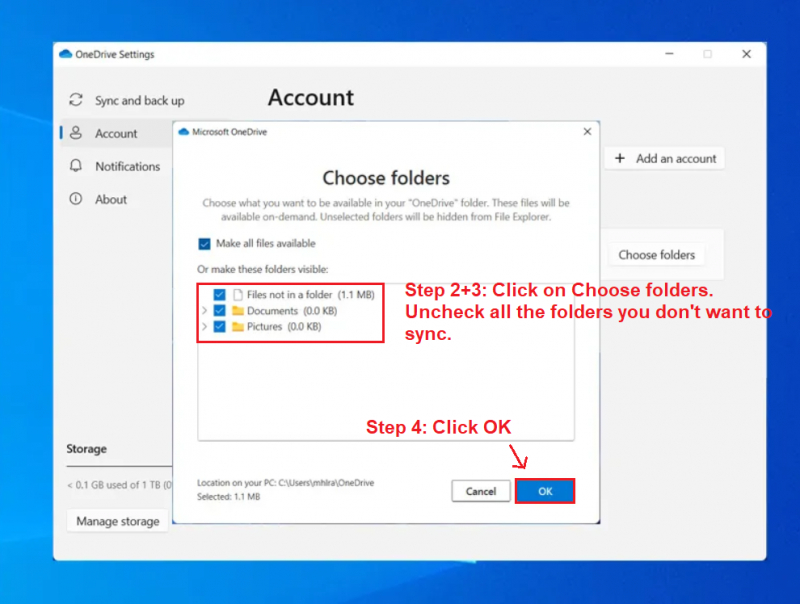
Cloud Storage -
In the latest versions of Windows, three significant features reserve substantial portions of your data drive for storage: Hibernation, System Restore, and Page File. While we advise against altering the Page File, you can adjust the first two to regain disk space.
Hibernation
Hibernation captures your system state, saves it in a file called "hiberfil.sys," and then powers down your display, ports, data drive, and RAM. This feature is handy for quick breaks, as waking up from hibernation is faster than a cold boot. However, the "hiberfil.sys" file is sizeable, typically around 75% of your total RAM. If you have 4 GB of RAM, it's a hefty 3 GB.To remove it, you must disable hibernation:
- Press the Windows key + X and choose Command Prompt (Admin).
- To disable hibernation, type: powercfg.exe /hibernate off
- To enable hibernation, type: powercfg.exe /hibernate on
System Restore
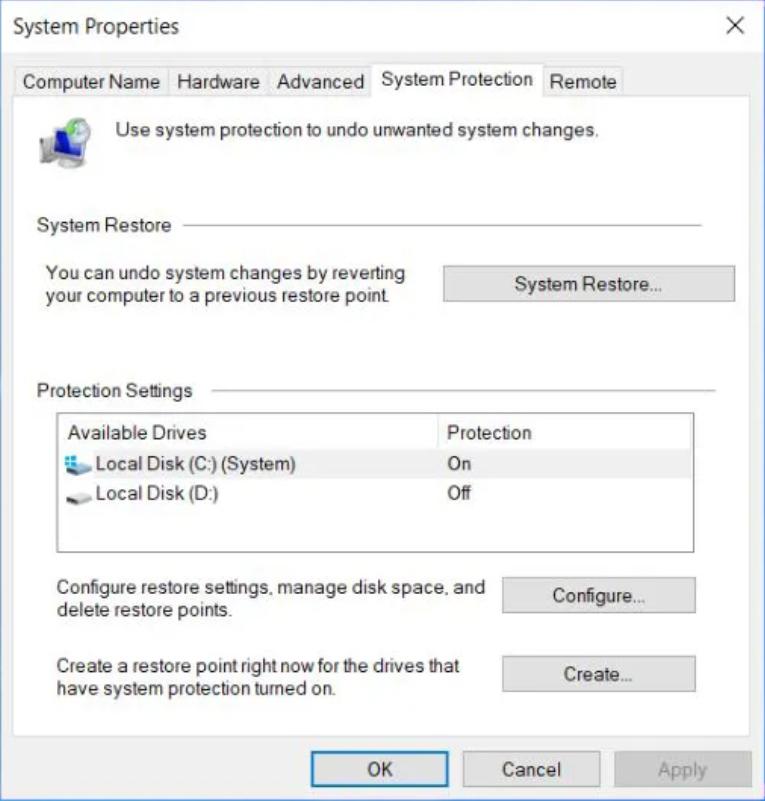
Windows's latest version relies on System Restore instead of a recovery partition. It creates and stores system snapshots for potential recovery. These snapshots occupy a lot of space, with the default reservation being 15% of your data drive's capacity. For a 500 GB HDD, this is a significant 75 GB.You can adjust the percentage or disable System Restore:
- Launch the Control Panel app.
- In the top right, search for "system restore".
- Under System in the results, click "Create a restore point".
- In the System Protection tab, click "Configure".
- To disable System Restore, select "Disable system protection". Alternatively, under Disk Space Usage, adjust the "Max Usage" slider to allocate the desired space for System Restore.
Keep in mind that an average restore point consumes around 600 MB. It's advisable to reserve enough space for at least five of them, which totals to a minimum of approximately 3 GB.
Reserved Allocations 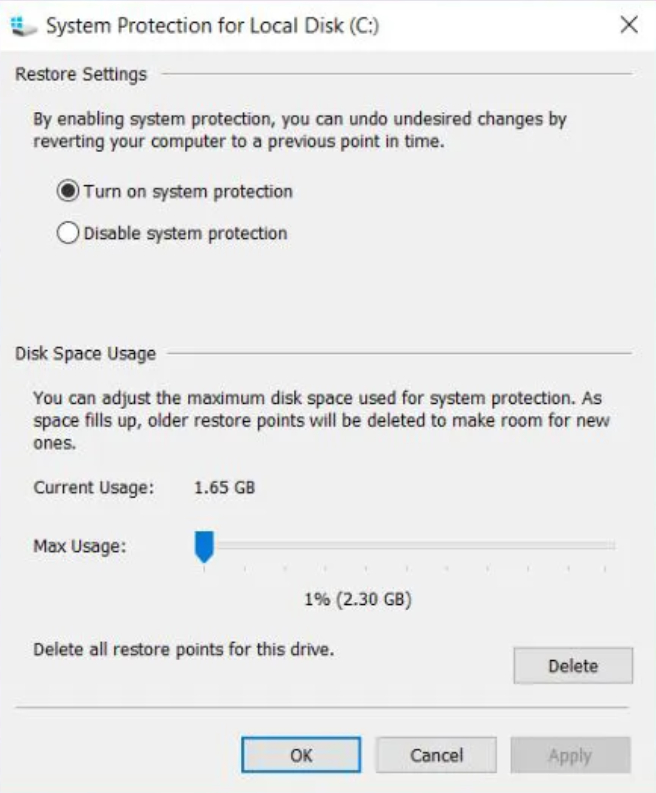
Reserved Allocations -
Running a monthly Disk Cleanup can maintain your system's cleanliness by removing redundant files. Additionally, we suggest utilizing the system version of Disk Cleanup each time a Windows Update completes successfully.
During a Windows update, a pre-update system backup is retained in case you need to revert due to any issues. You have the option to manually eliminate these restore points, or you can rely on Windows Disk Cleanup for the task.
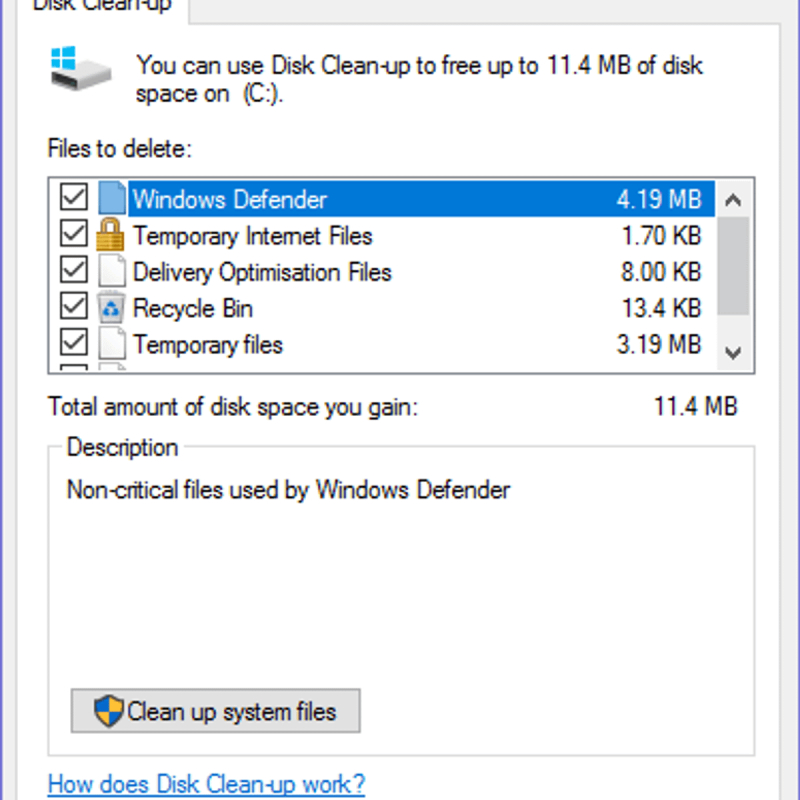
Disk Cleanup 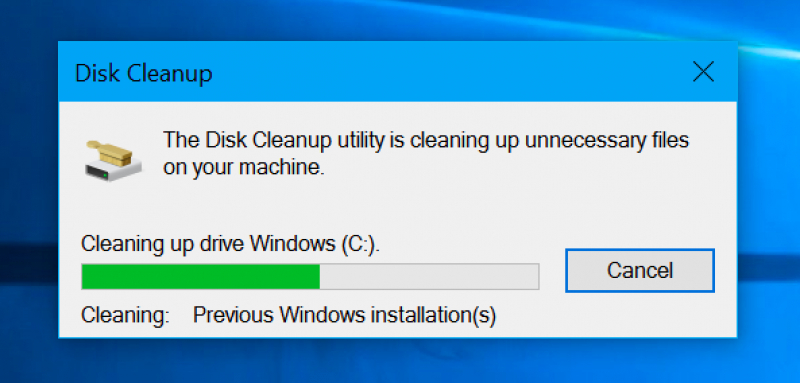
Disk Cleanup