Top 12 Best Ways to Fix 100% Disk Usage in Windows 10

Windows 10 is widely considered the most advanced operating system for desktop computers and laptops. However, many Windows users have reported encountering ... read more...errors and crashes that can significantly impact the system's performance. One of the most common errors is the 100% disk usage error, which can cause slow responsiveness and other performance issues. In this regard, Toplist has compiled some useful tips and potential fixes to help you resolve this error and improve your Windows 10 experience.
-
If you want to see if 100% disk usage issues are occurring, try using Windows Search to find files or programs as well as any other activities that require using the drive to do some work such as stars. copy, paste,...
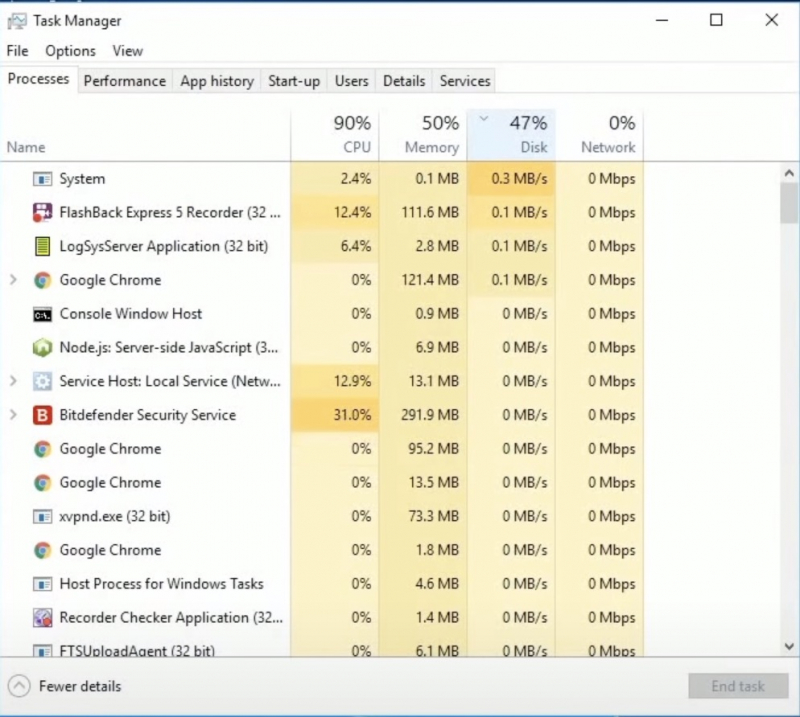
Then, use Task Manager to run a test drive check to see if the problem is affecting you.To do this, do the following:
- First, press Ctrl+Alt+Del and select Task Manager (or you right-click on the Taskbar and select Task Manager or press Ctrl+Shift+Esc). The run takes a few minutes to open.
- On the Processes tab, find the Disk column. If your disk shows 100% and is highlighted in red to indicate you are having disk performance problems.
- Problematic sectors on your HDD can cause 100% disk usage issues in Windows 10.
You can further make use of Windows' built-in drive check feature which may fix this:
- Open Windows Explorer
- Select This PC
- Right-click the C: drive and select Properties > Tools
- In the Error checking section, click Check > Scan Drive
=> Scan the drive to repair it. A reboot may be necessary.
It's important to ensure that your computer is free from malware. Whether you're using free or paid security software, it should be capable of handling any issues that may arise. Tools such as Malwarebytes Anti-Malware can scan your system drive and detect any problems that may exist:
- If threats are found, use the software's suggestions to remove them and reboot.
- Next, retest your drive's performance.
- Hope you have resolved the issue.
Run Disk Check 
Image by cottonbro studio via pexels.com -
Need to check if the Windows Search error is an error that leads to increased disk load due to search problems.
To check and prevent, you need to do the following:
- Right-click on Start.
- Click Windows PowerShell (Admin).
- Entering net.exe stops "Windows Search".
=> Helps solve most problems. If there are no changes, immediately after restarting, you can permanently disable Windows Search and Indexing.To turn it off completely, do the following:
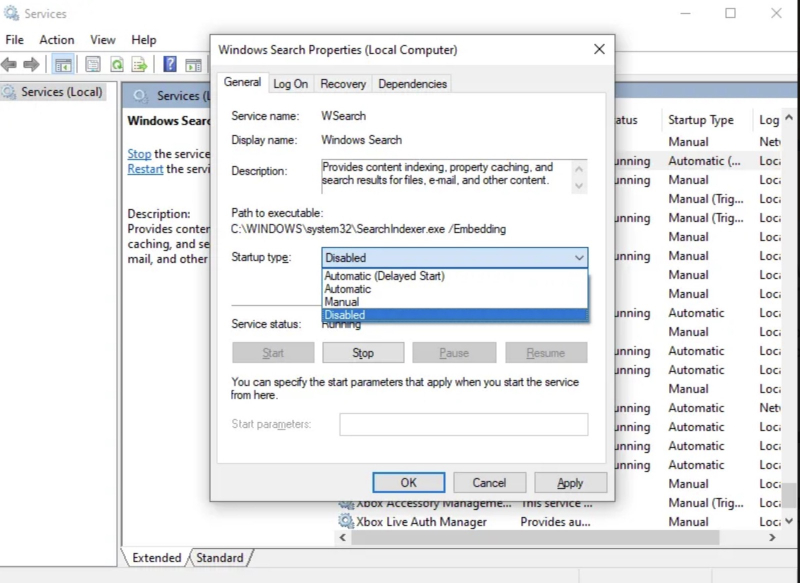
- Press WIN + R.
- Type msc, then click OK.
- In the Services window that opens, find Windows Search and double-click to open it.
- In Windows Search Properties, find the Startup type and select Disable.
- Or you click Stop to cancel the service
- Click OK to save your changes.
=> Moments after turning off Windows Search, your Windows 10 performance will improve significantly.
The SuperFetch service is called "SysMain". Is the service that causes disk usage problems in Windows 10.
- To prevent this service from causing disk usage problems, open another Windows PowerShell (Admin) and enter: net.exe stop sysmain. A series of data will appear for you to check.
- You run Check Disk in PowerShell. By typing chkdsk.exe /f /r
- It does not say that your PC must be restarted for Check Disk to complete, so make sure you have closed all your applications first.
Check Windows Search 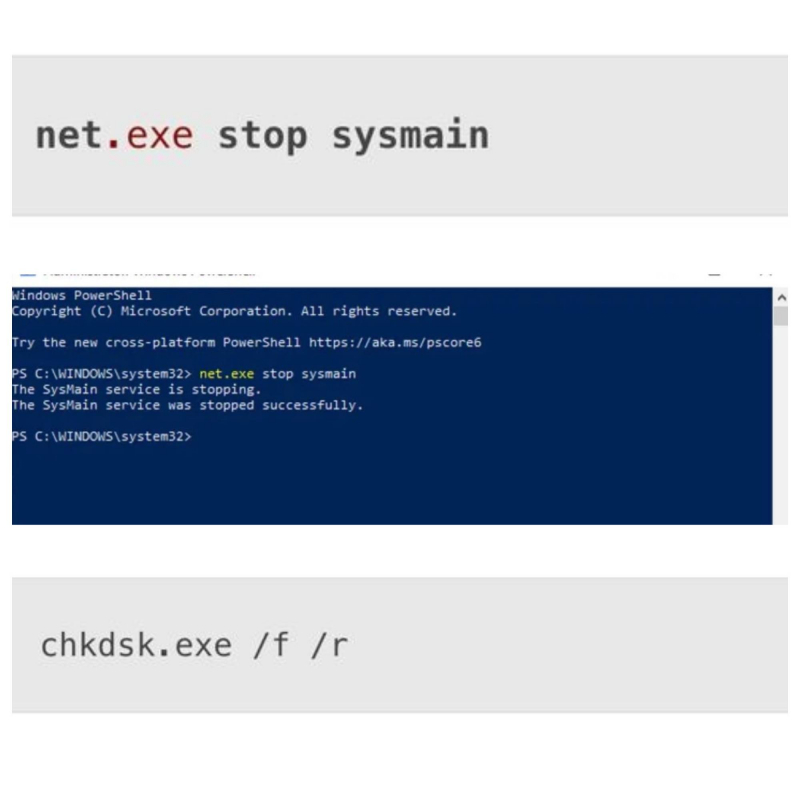
Disable SysMain -
Please check if the Flash feature is turned off to ensure your computer is vulnerable to serious damage to the drive. When Flash is turned on, Windows 10 will use 100% of the hard drive with the Google Chrome browser.
To turn off Flash in the Google Chrome browser, proceed as follows:
- Open Menu > Settings > Privacy and security
- Click on Site Settings
- Search for Flash and set the toggle to Block sites from running Flash
- Click Back to agree, then press F5 to restart the browser
- Next, the Chrome browser updates automatically or manually by going to Menu > Help > About Google Chrome and waiting for the update process to complete.
Note: New versions of Chrome typically no longer support Flash.

Image by Andrew Neel via pexels.com 
Image by Athena via pexels.com -
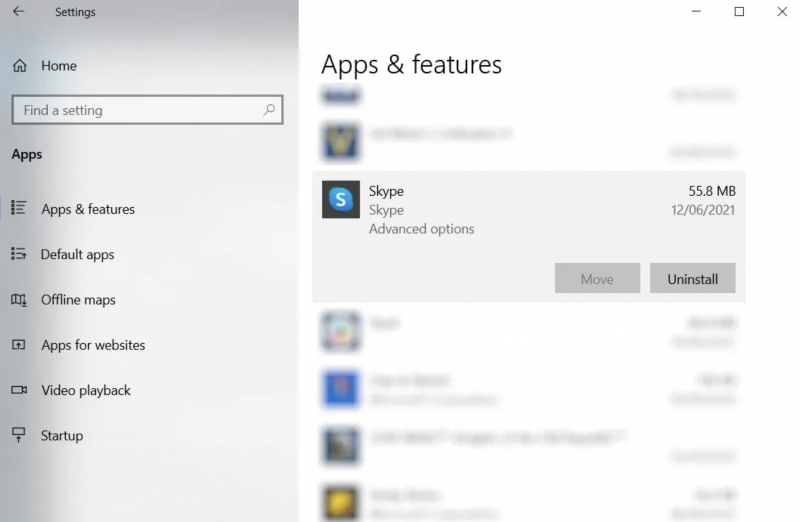
Next, you can refer to how to fix any problems with Skype - this is also an application that contributes to 100% hard drive usage. Nowadays, in the era of digital development, it is reasonable for group or company meetings to take place on Skype. So it is also the culprit using 100% of disk memory.
Therefore, you need to stop Skype from running by doing the following:
- Press the keyboard shortcut Win + I to open Settings
- Go to Apps > Apps & features and scroll down to Skype
- Click Skype, then click Advanced options
- Here, scroll down to Terminate and click the button.
-> Then, go back to Task Manager to see the changes. You might also consider finding a Skype for Windows alternative. If you've tried the above methods and they don't work, think about turning off Skype's auto-download feature to reduce disk usage by 100%. Just change from On to Off under Runs at log-in. If you are someone who does not use Skype often, Repair, Reset, and even Uninstall Skype to help fix your problem.
Fix Any Issues With Skype 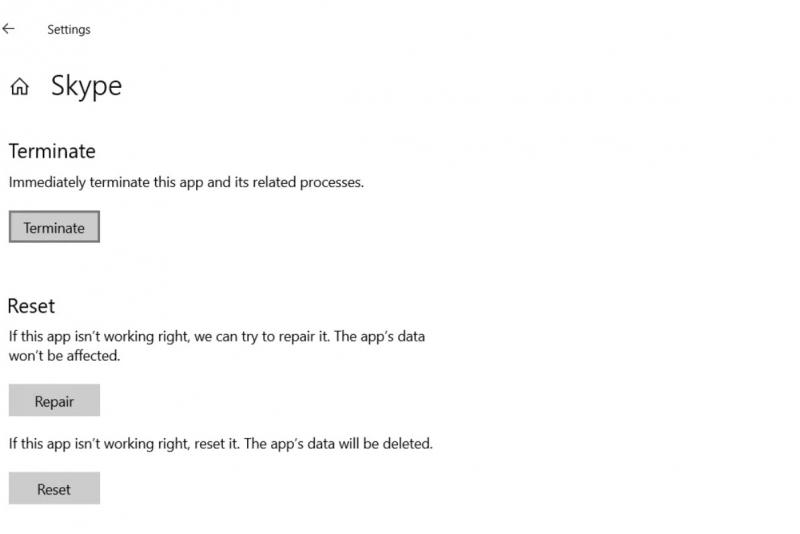
Fix Any Issues With Skype -
It was also discovered that a StorAHCI.sys driver was the cause of 100% hard drive usage. StorAHCI.sys is a type of program for storage devices that connect to a PC or laptop via the Advanced Host Controller Interface PCI-Express.
To do this, you will follow these steps:
- Right-click Start and Open the Device Manager
- Expand IDE ATA/ATAPI Controllers
- If an AHCI Controller entry is listed, double-click, then open the Driver tab and select Driver Details.
If the driver is listed as C:\Windows\system32\DRIVERS\storahci.sys then this error may affect you. From there, follow the steps below:
- Close the driver details box
- In the Details tab, select Device Version Path from the drop-down menu
- Right-click where the value is listed, and select Copy
- Launch your text editor (like Notepad) and Paste the content
- Next, press WIN+R and type regedit, then click OK
- Find HKEY_LOCAL_MACHINE\System\ CurrentControlSet\Enum\PCI\ and use the string pasted from Notepad to open the correct AHCI Controller, followed by the random number.
- Here, expand Device Parameters\Interrupt Management\ MessageSignaledInterruptProperties and you will see MSISupported listed in the right pane. Double-click this, then change the Value data: to 0. Click OK to confirm and follow the instructions to restart Windows.

Fix the PCI-Express Firmware Bug 
Image by Monoar Rahman via pexels.com -
It is possible that Steam game programs are also the system causing 100% disk usage. You just need to delete Steam's cache to fix it:
- First, exit Steam. If it crashes, use Windows 10 Task Manager to close the software.
- Next, open the box run Win + R and enter steam://flushconfig
- A dialog box appears stating that the content will be deleted.
- Click OK to continue.
Note: that games and save files will be retained, so there is no risk of them being deleted.

Problems Caused by Steam 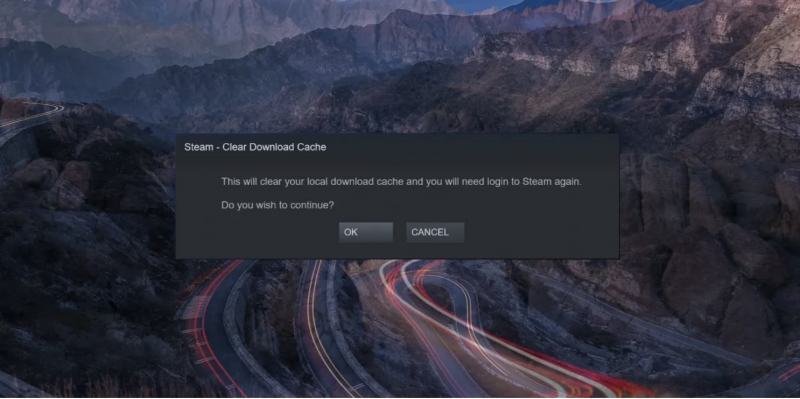
Problems Caused by Steam -
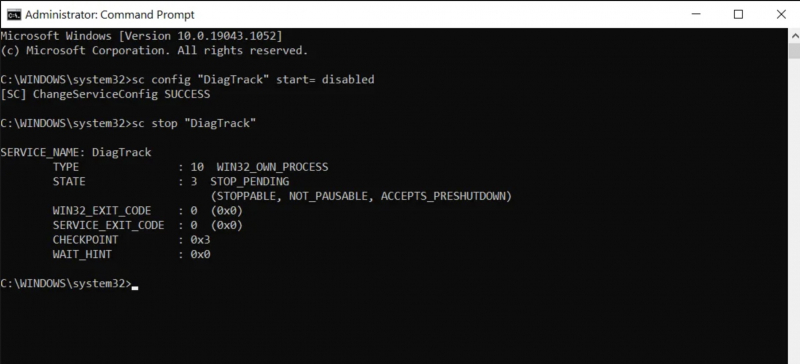
If you are experiencing 100% disk usage issues on your Windows 10, disabling diagnostic tracking can help resolve the problem. Simply turning off the DiagTrack service can reduce hard drive usage and speed up your system. If this service is causing a high disk usage error, stopping it from launching can be an effective solution.
To turn off diagnostic tracking on Windows 10, you should follow these steps:
- Open Command prompt as an admin. By pressing Start and entering cmd in the search box
- In the results select Run as administrator
- Input sc config “DiagTrack” start= disable and then hit Enter
- Type sc stop “DiagTrack”
- Navigate through Settings> Notification & actions and disable Get tips, tricks, and suggestions as you use windows
Disable Diagnostic Tracking 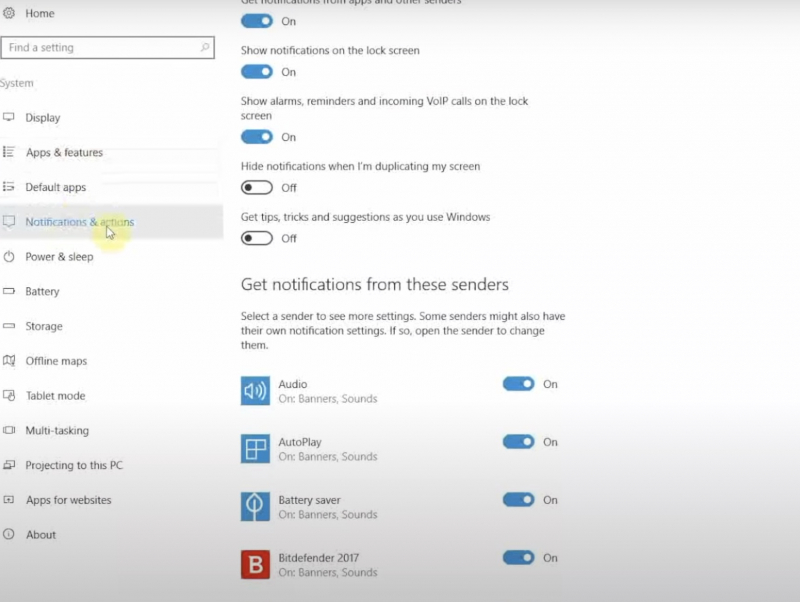
Disable Diagnostic Tracking -
In case a particular Windows update has difficulty downloading, you must close all applications and wait for the update to download. Once the update has been downloaded, you should restart your computer. Problems with Windows updates can also cause 100% disk usage errors.
With Windows Update problems, you have two options:
- Leave your computer alone---close all open applications and wait. The files will eventually be downloaded, but it depends on how Windows Update schedules and arranges them.
- Shut down your computer---once done, restart and wait for Windows Update to resolve the issue.

Image by Lisa Fotios via pexels.com 
Image by Philbert Pembani via pexels.com -
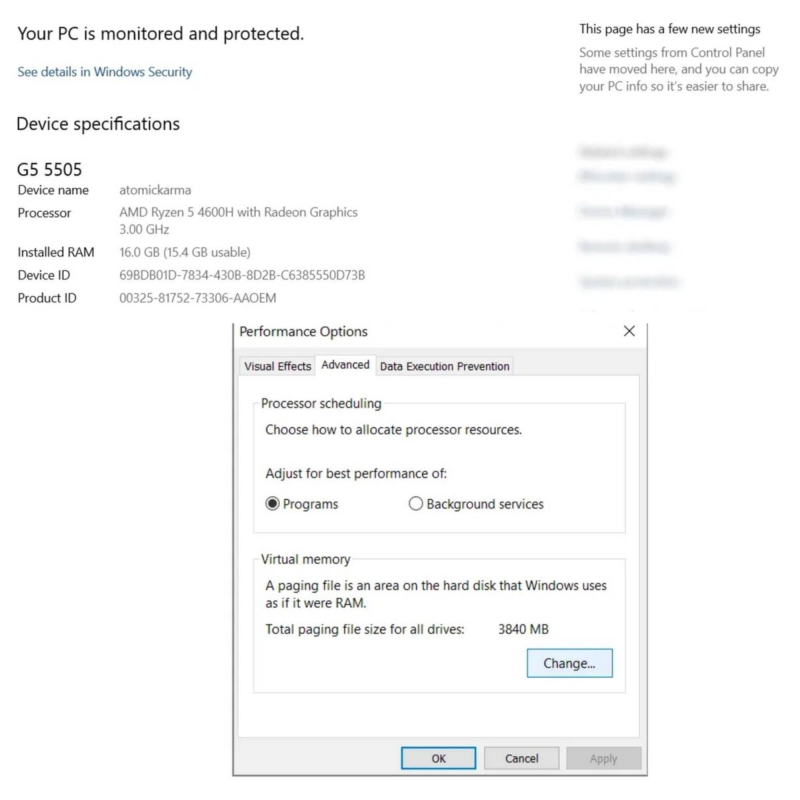
Windows will use virtual memory to save files when RAM is not running enough processes and continuously switches between virtual memory and RAM. If the RAM is too small, leading to full hard drive errors, you need to delete virtual memory. Virtual memory is a combination of RAM and hard drive. If not ignored, it will cause the hard drive to overwork.
To reset virtual memory to resolve the 100% disk usage issue, you should do the following:
- Press Windows + Break/Pause
- On the right, find and click Advanced System Settings
- In the Advanced tab, go to Performance > Settings
- Select the new Advanced tab
- In the section labeled Virtual Memory, click Change
- Uncheck the Automatically manage paging file size for all drives check box
- Next, select the Windows drive (usually C:) and select Custom size
- Add initial size and maximum size; note both are measured in MB, not GB
- After entering the values, press Set then OK to continue
- These numbers can be confusing, so for the first value, rely on the recommended option. For maximum value, aim for no more than 1.5 times your system RAM.
The next step is to delete the temporary files that were used in the previous virtual memory allocation:
- Open Run with WIN+R
- Enter the temperature and press OK
- In the temporary folder, select all files with Ctrl+A and press Delete
Reset Virtual Memory 
Reset Virtual Memory -
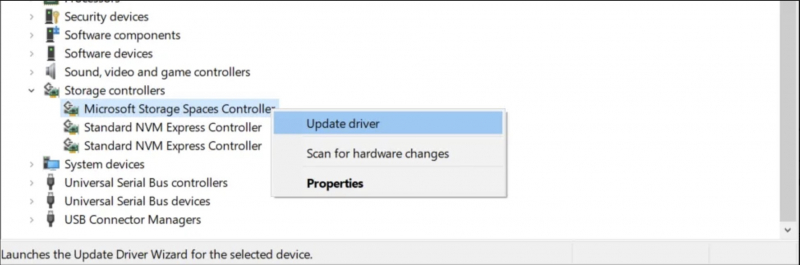
To avoid causing the disk to fail, try upgrading to the latest SATA driver:
- Right-click on Start
- In the Power User menu select Device Manager
- Expand Storage Controllers
- Determine the correct controller for your SATA device
- To update, right-click each controller and select Update Driver
- Click the Browse my computer for driver software option
- Next, select Let me pick from a list of available drivers on my computer
- Then select Standard AHCI Controller and see how this affects performance
Install the Latest SATA Drivers 
Image by Jules Amé via pexels.com -
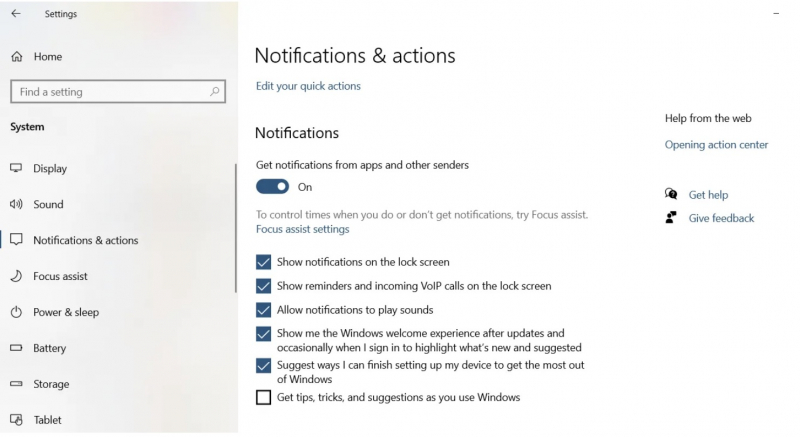
Windows Help tools also indirectly cause the drive to be 100% used. To prevent this problem from happening, you need to turn it off.
To turn off Windows Help for Windows 10, do the following:
- Press WIN+I to open Settings
- Here, select System > Notifications & actions
- Find and turn off Get tips, tricks and suggestions as you use Windows
- Please wait a few minutes, everything will be completed.
Windows Help 
Image by Taryn Elliott via pexels.com