Top 10 Best Ways to Open Disk Defragmenter in Windows 10

In Windows 10, Disk Defragmenter is a useful tool for optimizing the performance of your computer's hard drive. By rearranging data on the disk, it can help ... read more...improve speed and efficiency. There are a few simple ways to access Disk Defragmenter on your Windows 10 system, and Toplist has listed some ways to help open Disk Defragmenter in Windows 10, that you can refer to.
-
Maintaining a smooth and efficient computer system involves regular optimization tasks, and defragmenting your hard disk drive is one of the essential steps to enhance performance. Here's a comprehensive guide on how to open Disk Defragmenter in Windows 10 using the Start Menu Search Bar:
- Launch the Search Bar: Begin by clicking the Start menu search bar icon located on the taskbar or press the Windows key + S simultaneously.
- Initiate Search: Type "Defragment" or "Optimize drives" into the search bar. The system will automatically start filtering and displaying relevant search results.
- Select Disk Defragmenter: Locate and select the Best match result, which should include the Disk Defragmenter or Optimize Drives app. Click on it to launch the Disk Defragmenter tool.
By following these steps, you can easily access the Disk Defragmenter tool in Windows 10 using the Start Menu Search Bar.
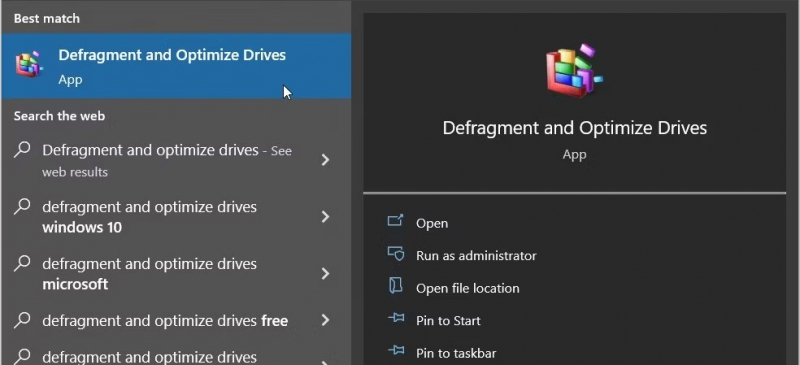
Image via www.makeuseof.com 
Image by Windows via unplash.com -
Opening Disk Defragmenter through the Run Command dialog box in Windows 10 provides a quick and efficient method to optimize disk performance. To open the Disk Defragmenter in Windows 10 using the Run Command dialog box, you can follow these steps:
- Initiate Run Command: Press the Windows key + R simultaneously to open the Run Command dialog box.
- Execute Disk Defragmenter: Type "dfrgui" into the Run Command dialog box and press Enter.
- Select Drive for Optimization: In the Disk Defragmenter window, select the local disk you want to optimize and click the "Analyze" button.
- Initiate Defragmentation: If the analysis indicates fragmentation, click the "Defragment disk" button to start the optimization process.
This quick and efficient method provides a streamlined way to optimize disk performance on your Windows 10 system.
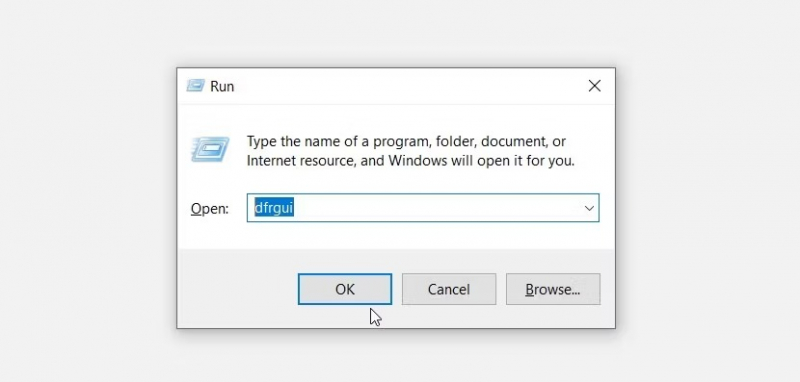
Image via www.makeuseof.com 
Image by Windows via unplash.com -
Disk Defragmenter is a tool that helps improve the performance of your computer by rearranging the files on your hard drive so that they are stored continuously. This can make it faster for your computer to access files and programs. To open Disk Defragmenter in Windows 10 using the Start Menu, follow these steps:
- Initiating the Start Menu: To begin, locate the Start icon situated on the taskbar or simply press the Win key on your keyboard. This will launch the Start Menu, a central hub for accessing various applications and system settings.
- Navigating to Windows Administrative Tools: Once the Start Menu is open, scan the left-hand panel and identify the Windows Administrative Tools folder. Click on this folder to expand its contents.
- Launching Disk Defragmenter: Within the Windows Administrative Tools folder, locate and select the "Defragment and Optimize Drives" option. This action will launch the Disk Defragmenter tool, allowing you to manage your hard disk drive's defragmentation process.
In the Disk Defragmenter window, you can select the drive you want to defragment and click Analyze. Disk Defragmenter will then scan the drive and determine if it needs to be defragmented. If so, you can click Defragment.
Image via www.makeuseof.com 
Image by Windows via unplash.com -
The File Explorer Address Bar provides a convenient and efficient method for accessing system tools and utilities in Windows 10. To open Disk Defragmenter in Windows 10 using the File Explorer Address Bar, you can follow these steps:
- Launch File Explorer: Press the Windows key + E simultaneously to launch File Explorer.
- Access Disk Defragmenter: In the File Explorer address bar, type "dfrgui" without quotation marks and press Enter. This will promptly launch the Disk Defragmenter application, allowing you to manage fragmentation on your hard disk drive effectively.
By utilizing the File Explorer address bar, you can easily access various system tools and utilities in Windows 10, including Disk Defragmenter, for optimizing the performance of your local disk.
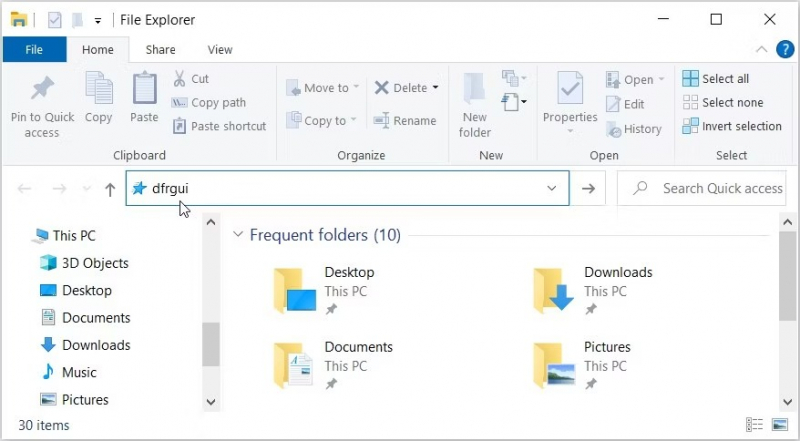
Image via www.makeuseof.com 
Image by Windows via unplash.com - Launch File Explorer: Press the Windows key + E simultaneously to launch File Explorer.
-
When using the System Settings in Windows 10, you can access the Disk Defragmenter tool to optimize the performance of your computer's storage drives. Here's how to open Disk Defragmenter in Windows 10 using the System Settings:
- Launch System Settings: Press the Windows key + I to open the System Settings app.
- Search for Disk Defragmenter: In the search bar at the top of the Settings window, type "Defragment and Optimize your drives."
Additionally, it's important to note that while it's recommended to run Disk Defragmenter to improve disk fragmentation on all your hard disk drives, it's not advised to do disk defragmentation on solid-state drives, as their life shortens significantly.
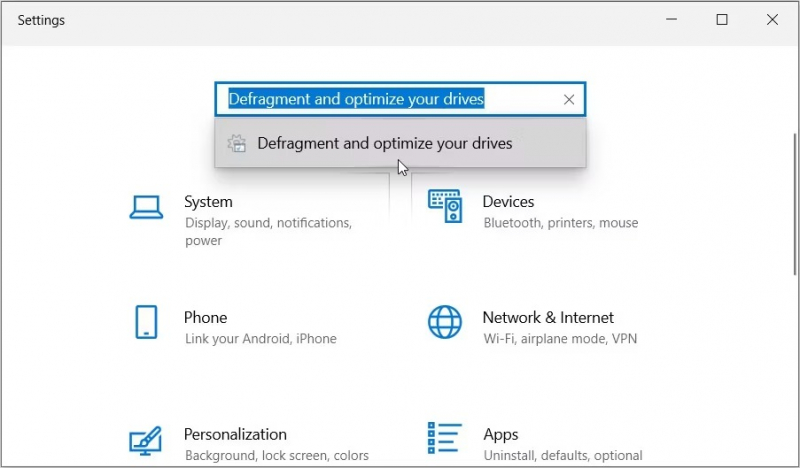
Image via www.makeuseof.com 
Image by Windows via unplash.com -
When it comes to opening Disk Defragmenter in Windows 10, utilizing the Task Manager can be a convenient approach. By following the steps below, you can easily access the Disk Defragmenter application:
- Begin by using the Start menu search bar to type "Task Manager" and select the Best match.
- Within the Task Manager, click on the "File" tab and select "Run new task".
- In the provided search bar, type "dfrgui" and then click "OK" to launch the Disk Defragmenter application.
By employing these steps through the Task Manager, you can promptly access the Disk Defragmenter tool in your Windows 10 system.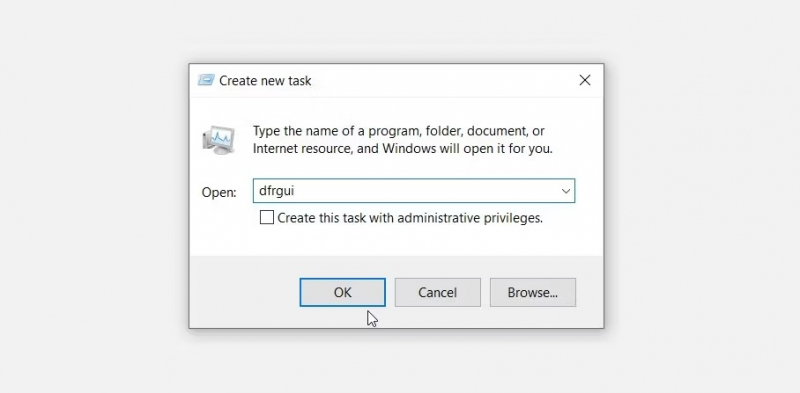
Image via www.makeuseof.com 
Image by Windows via unplash.com -
The Control Panel provides access to various system settings and utilities in Windows 10. One important tool found within this interface is the Disk Defragmenter, which optimizes the storage locations of files on a hard drive for improved performance. To open Disk Defragmenter in Windows 10 using the Control Panel, you can follow these steps:
- Initiate the Run Command: Press the Windows key + R simultaneously to open the Run dialog box.
- Access the Control Panel: Type "Control Panel" into the Run command field and press Enter.
- Switch to Large Icons View: In the Control Panel, locate and select the "View by" drop-down menu. Choose "Large icons" from the available options.
- Navigate to Administrative Tools: Locate and double-click the "Administrative Tools" icon to access the administrative tools section.
- Launch Disk Defragmenter: Within the Administrative Tools menu, double-click the "Defragment and Optimize Drives" icon to launch the Disk Defragmenter tool.
These steps provide a straightforward method for accessing the Disk Defragmenter tool within the Windows 10 operating system.
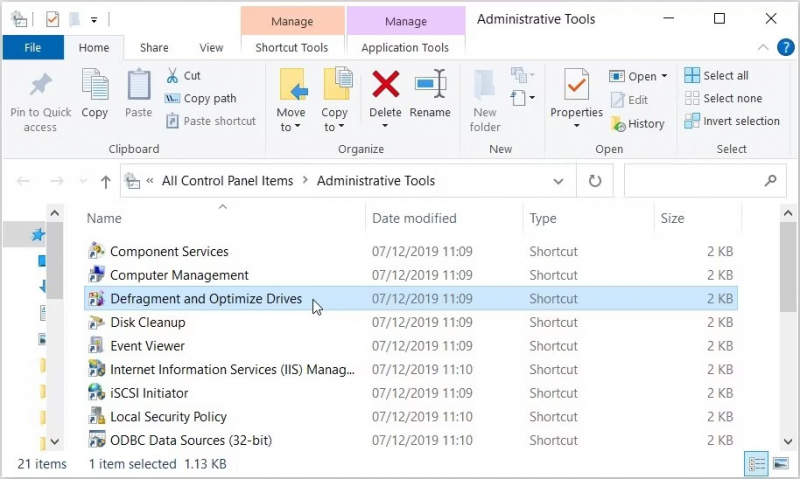
Image via www.makeuseof.com 
Image by Windows via unplash.com -
Opening Disk Defragmenter in Windows 10 using the Command Prompt or PowerShell brings about a streamlined approach to managing disk optimization tasks. This method allows users to conveniently access and utilize the Disk Defragmenter tool, contributing to improved system performance and efficiency. To achieve this, the following steps can be followed:
Command Prompt:
- Access the Run command dialog box using Win + R.
- Launch an elevated Command Prompt by typing CMD and hitting Ctrl + Shift + Enter.
- To open the Disk Defragmenter application, type the appropriate command and press Enter.
PowerShell:
- In the Start menu's search bar, type PowerShell.
- Right-click on the Best match result and select Run as administrator from the context menu.
- To launch the Disk Defragmenter application, type the relevant command and press Enter.
By following these steps, users can conveniently access Disk Defragmenter through the Command Prompt or PowerShell, enabling efficient management of disk defragmentation tasks for enhanced system performance and optimization.
Image by Windows via unplash.com 
Image by Windows via unplash.com -
Searching for the Recovery Drive App in the System32 Directory involves locating a specific application within the core Windows system files to access recovery options. This method can be used to manage system recovery and troubleshoot issues within the Windows operating system. Here are the steps to open Disk Defragmenter in Windows 10 using this method:
- To access File Explorer, press Win + E or click the File Explorer icon on the taskbar.
- Choose "This PC" from the left-hand menu to open the Windows folder.
- Double-click on the Local Disk (C:) option on the right to navigate to your local disk.
- Scroll down to locate and double-click the "System32" folder.
- Inside the System32 folder, you can access the Disk Defragmenter software by locating and double-clicking the "Defrag"
These steps will guide you on how to access the Disk Defragmenter using the System32 directory in Windows 10.
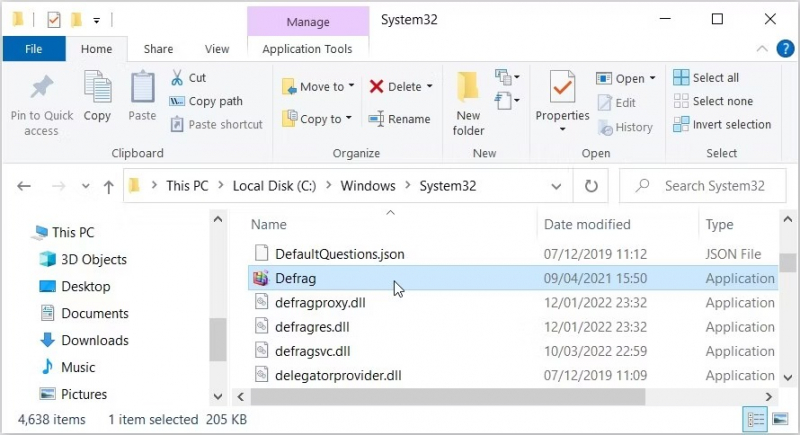
Image via www.makeuseof.com 
Image by Windows via unplash.com -
The Disk Defragmenter desktop shortcut provides a quick and easy method to access and optimize disk performance in Windows 10. To access Disk Defragmenter in Windows 10 using Disk Defra desktop shortcut, follow these steps:
- Navigate to the Desktop: Press the Win + D keys simultaneously to minimize all open windows and access the desktop.
- Create a New Shortcut: Right-click on an empty area of the desktop and select New > Shortcut.
- Specify Shortcut Location: In the "Create Shortcut" window, enter the following path in the "Location" field "%windir%\system32\dfrgui"
Once you have completed these steps, you can access Disk Defragmenter quickly and easily from your desktop, enabling you to perform disk defragmentation effectively.
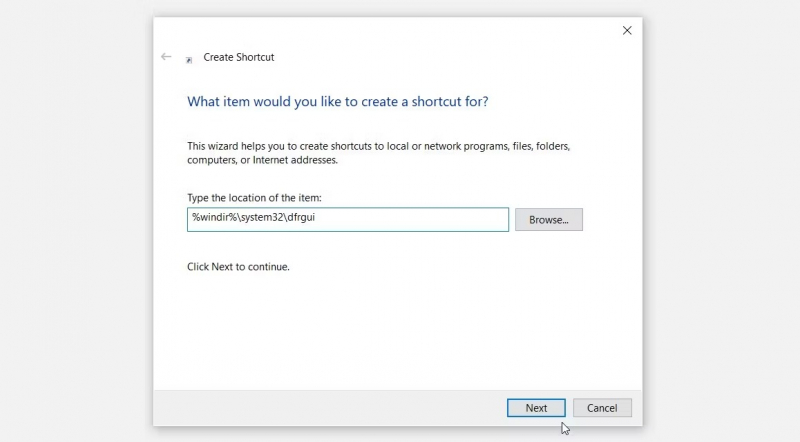
Image via www.makeuseof.com 
Image by Windows via unplash.com