Top 9 Ways to Fix Sound or Audio Problems on Windows 10
Dealing with sound or audio issues in Windows 10 can be quite frustrating. However, Toplist has compiled a list of ways, ranging from checking hardware ... read more...connections to updating drivers and adjusting system settings. Following these steps, you can increase the likelihood of restoring your sound and audio functions on your Windows 10 device.
-
Here's a step-by-step guide to checking volume levels and muted outputs on Windows 10 to fix sound or audio problems:
- Check volume levels, ensure it's not muted or set too low.
- Adjust Volume Levels in Volume Mixer to adjust app-specific volume level
- Check App-Specific Volume Levels, and verify volume settings within individual apps.
- Close Unnecessary Audio-Heavy Apps
- Restart Your Computer to resolve temporary issues.
By following these steps, you can troubleshoot sound problems and manage audio settings effectively in Windows 10.
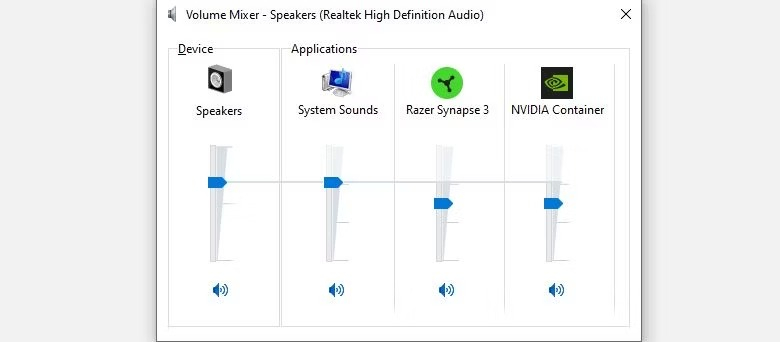
Image via www.makeuseof.com 
Image by Markus Spiske via unplash.com -
To ensure you're using the correct audio output on Windows 10 and fix sound or audio problems, follow these steps:
- Click the volume icon, above the volume slider, you'll see the name of the current device. Click it to open a menu of available devices.
- Select the correct output device from the list of available devices, choose the one you want to use.
- Right-click the Volume icon and select "Open Sound Settings" to go to Settings > System > Sound.
- Choose your output device, click Manage sound devices to view all connected devices. Use the Test button to check each device.
- Ensure that the desired device is not turned off. If it is, click the option and select "Enabled" to activate it.
With these step you can troubleshoot sound and audio issues on your Windows 10 system effectively and optimize your audio experience.
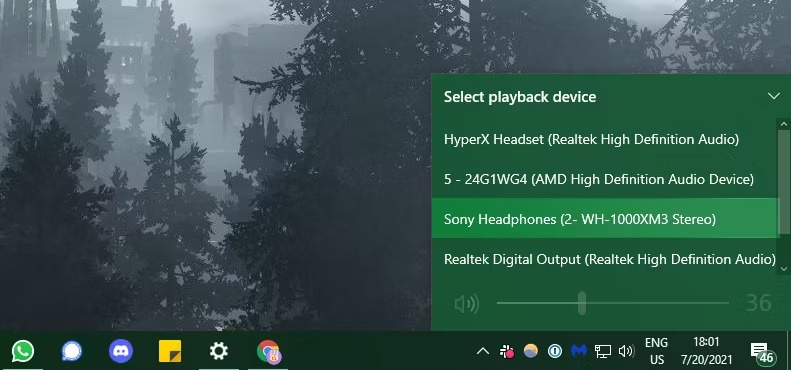
Image via www.makeuseof.com 
Image by Bram Van Oost via unplash.com -
To troubleshoot sound or audio problems on Windows 10, follow these steps:
- Check Physical Connections, to ensure cables are securely plugged into your computer and devices. Reconnect to eliminate loose connections and replace damaged cables.
- Troubleshoot Wireless Devices, and confirm proper pairing for wireless audio devices in Settings > Devices > Bluetooth & other devices.
- Disconnect all audio devices except the one in use to avoid interference.
You can successfully resolve a variety of sound or audio issues on Windows 10, including those involving audio devices and recording, by following these steps.
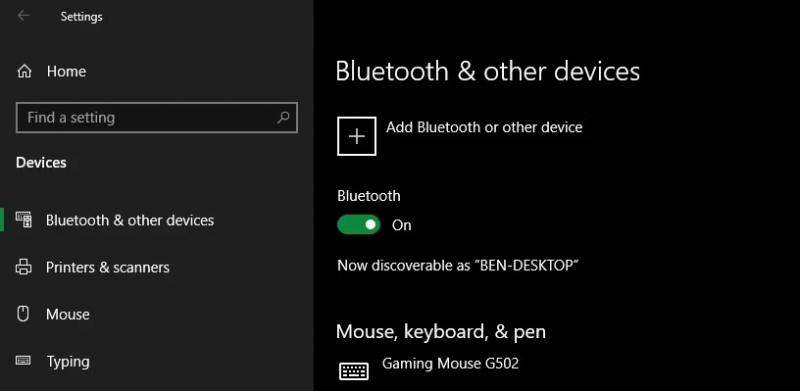
Image via www.makeuseof.com 
Image by Windows via unplash.com -
To fix sound or audio problems on Windows 10, you can utilize the built-in Windows Audio Troubleshooter. Follow these steps to resolve common audio issues and ensure optimal sound performance on your Windows 10 device:
- Head to Settings > Update & Security > Troubleshoot > Additional Troubleshooters.
- Select 'Playing Audio'.
Running the Windows Audio Troubleshooter is a quick and easy first step to try and resolve sound or audio problems on your Windows 10 or 11 device."
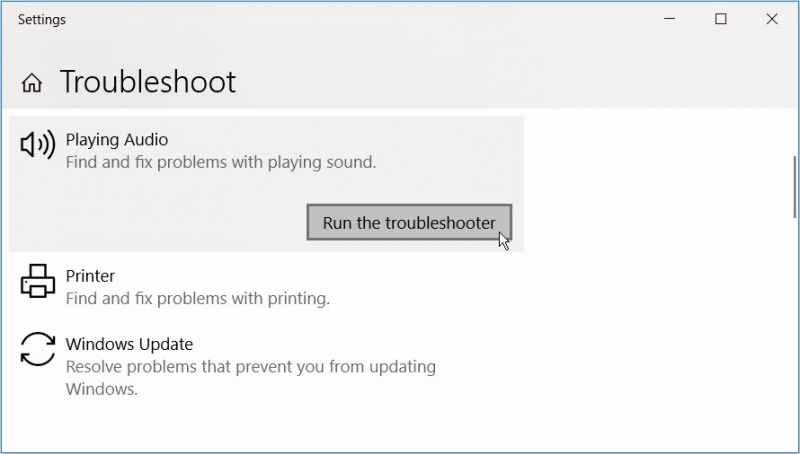
Image via www.makeuseof.com 
Image by Sirinda Ins via pexels.com -
Drivers typically function well once initially configured, but they can encounter issues, such as corruption or the need for an update, which could lead to annoying problems.
- Rolling back the driver access the Device Manager by right-clicking the Start button or using the shortcut Win + X.
- If rolling back isn't an option, select either "Update Driver" to manually update the driver or "Uninstall Device" to remove the problematic driver.
- After uninstalling the driver, restart your system.
Implementing these steps should help you to fix sound or audio problems on Windows 10 effectively.
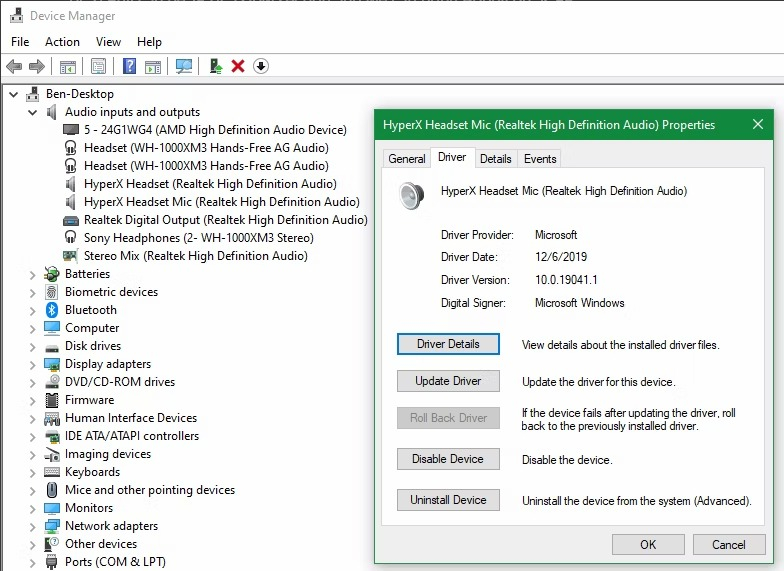
Image via www.makeuseof.com 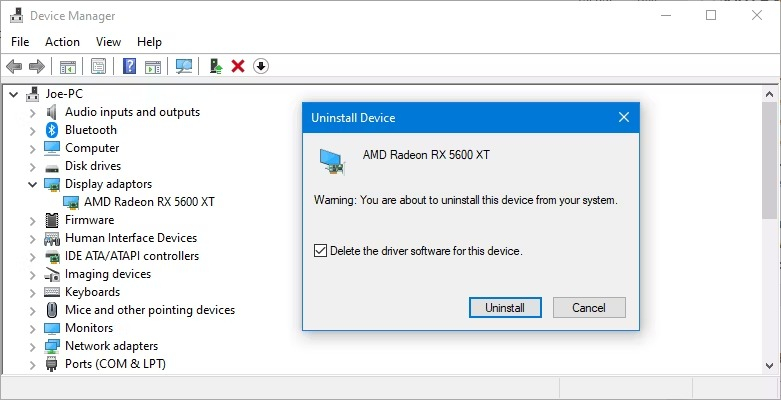
Image via www.makeuseof.com -
To resolve sound or audio problems on Windows 10 related to the IDT High Definition Audio CODEC, follow these steps for a manual driver update:
- Access the Device Manager by right-clicking on the Start button and selecting Device Manager.
- Under the Sound, Video, and Game Controllers section, locate the IDT High Definition Audio CODEC.
- Right-click it and select Update Driver. If the option is not visible, proceed to the next step.
- Choose "Browse my computer for drivers" and then "Let me pick from a list of available drivers on my computer."
- Ensure that "Show compatible hardware" is checked.
- Under Model, select "High Definition Audio Device," then click Next and confirm the update by clicking Yes.
- Restart your system to apply the changes.
After completing these steps, your audio problem should be resolved. If the issue persists, consider exploring further options to enhance your PC's sound quality.
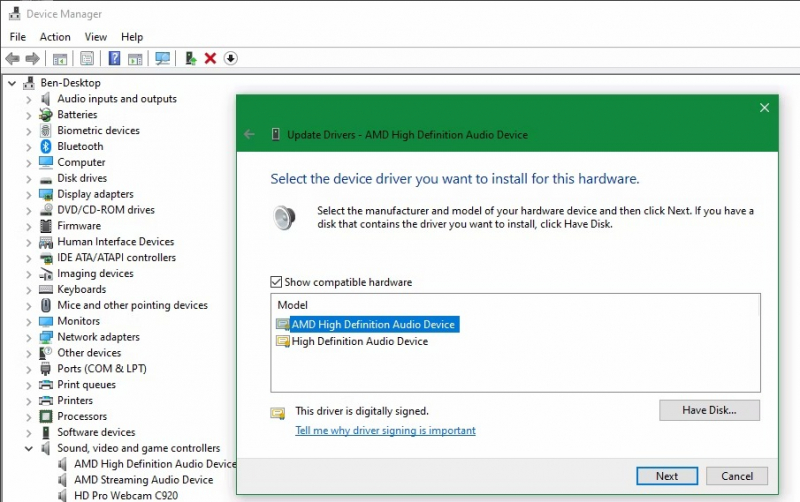
Image via www.makeuseof.com 
Image by Avel Chuklanov via unplash.com -
To fix Realtek High Definition Audio problems on Windows 10, consider these steps:
- Check for updates on the Realtek website or through the Device Manager. Ensure consistency with your system's specifications.
- Disable, uninstall, and reinstall the latest version of Realtek WLAN drivers from the Realtek website, following the provided instructions. Reboot your system post-installation.
- Access the Realtek HD Audio Manager or Realtek Audio Console to disable front jack detection under Device Advanced Settings.
These steps can potentially fix audio issues related to Realtek High Definition Audio. Always ensure that the drivers and settings align with your specific system requirements and configurations for optimal results.

Image by stayhereforu via pexels.com Video via www.youtube.com/@ComputerSluggishTutorials -
To troubleshoot sound or audio issues on Windows 10, you can disable audio enhancements by following these steps:
- Right-click on the speaker icon in the System Tray and select "Sounds" to open the Control Panel's Sound window.
- Switch to the "Playback" tab and double-click on the audio device you're using.
- In the next window, click the "Enhancements" tab.
- Check the box labeled "Disable all enhancements" if it isn't already checked, then click "Apply".
- Ensure the desired device is set as the default by right-clicking on it and selecting "Set as Default Device".
You can disable Windows 10's audio enhancements and possibly fix any audio issues you may be having by doing these steps.
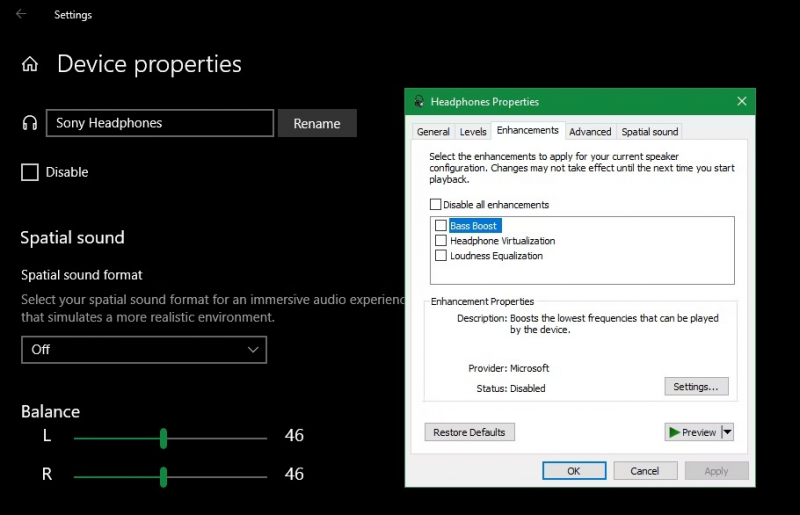
Image via www.makeuseof.com 
Image by Breakingpic via pexels.com -
Here's a step-by-step guide to resolving sound or audio problems on Windows 10 by restarting the Windows Audio Services:
- To begin, type "Services" into the Start menu search and select the "Services" desktop app from the search results.
- In the Services Manager window, scroll down to find the "Windows Audio" service from the list.
- Double-click on the "Windows Audio" service to open its properties window. Here, check if the service is currently running. If it is not running, click the "Start" button to initiate the service.
- While in the properties window of the "Windows Audio" service, ensure that the Startup type is set to "Automatic." If it is set to anything different, such as "Automatic (Delayed Start)," "Manual," or "Disabled," change it back to "Automatic."
- Similarly, in the Services Manager, locate the "Windows Audio Endpoint Builder" service and repeat the same process to ensure it is running correctly.
By following these steps, you can resolve issues related to sound not working on your computer by ensuring the proper functioning of the audio services. This should help address behind-the-scenes Windows problems causing the sound issues and restore audio functionality on your Windows 10 system.
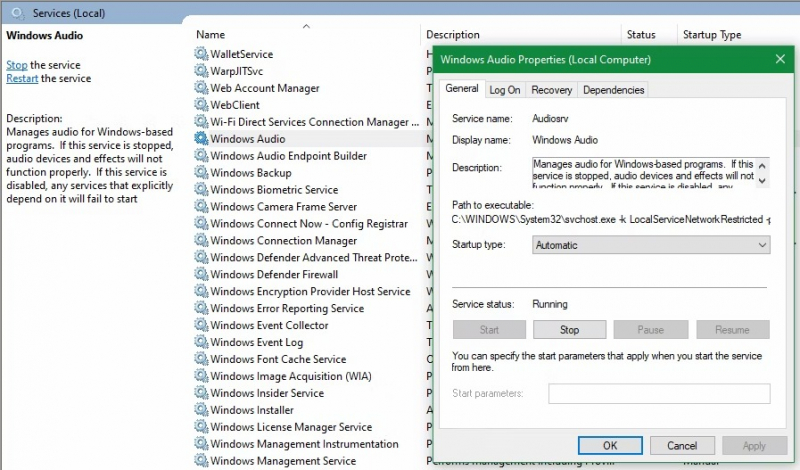
Image via www.makeuseof.com 
Image by LinkedIn Sales Navigator via pexels.com


